Wednesday, June 26, 2013

breakfast (or lunch...or brunch) sandwiches

Some days....okay, most days....Pinterest makes me hungry.

Which can be a good thing (on days when I find healthy recipes) or a not-so-good thing (exhibit a: I have an entire board dedicated to "Sweet Stuff").

And then some days I meet somewhere in the middle, and find a pretty healthy recipe that also satisfies my craving for some good old comfort food.
The other day I found a link to this recipe:


http://www.realsimple.com/food-recipes/browse-all-recipes/english-muffin-egg-pizzas-10000000663044/index.html

Although I'm really not a fan of the hard-boiled egg (I just eat the white part and throw away that gag-inducing-pasty-looking cooked yolk)...this breakfast sandwich (or "pizza" as they call it) looked pretty good.  So, of course I needed to put my own twist on it and change the recipe a little.  :)

Quick shout out to McD's for the changes I made to my recipe-- I had a coupon to try their new breakfast sandwich, and I used a lot of their ingredients to inspire my adjustments. 

Here's how I made my Egg White, Tomato, Ham, and White Cheddar Breakfast Sandwich

We'll start with the cast of characters (a.k.a. ingredients)...and note, this is just for one sandwich, which ends up being two open-faced "pizzas".


English muffin (I used whole wheat)
Ham
(McD's uses Canadian Bacon, and I might try that sometime but this is just thinly sliced deli ham)
White cheddar cheese, sliced
Tomato
Eggs (I used two since I was only using the whites)
Salt & Pepper
 
Very basic ingredients....and I might play around with them the next time I make this.  I'm thinking a white cheddar/béchamel sauce would be DELICIOUS on these!  Fresh herbs would be a great addition as well.  Okay....on to the actual recipe I used.... 
 
First step:  Preheat your broiler on high and have a pan/cookie sheet ready for the sandwiches.

 
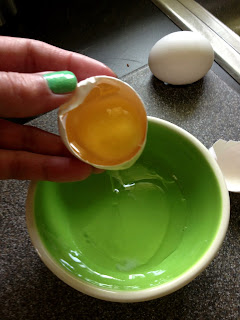
Separate the whites from the yolks if you're making it egg-white-only like I did. 
 
And revel in your masterful skills of separating eggs and juggling your iPhone to take a picture!
(sorry....I was just so proud of myself for not dropping either the egg OR my phone....I'm a little lot clutzy so this was a big deal).


Slice up the tomatoes.

 
Heat up a little butter in the pan, then pour in your egg whites.

 
I'm sure there is a more technical way to describe this cooking method, but I just kind of scooted around the egg whites until I had a rectangular-shaped egg.  I was eyeballing it to make something twice as large as the muffin halves.
 
Don't forget to season your eggs during this step- salt and pepper is all I used.

 
When it's ready, flip it.  I've never been great at flipping fried eggs, so leaving out the yolks makes this much easier for success.  :)

 
When it's done, cut it in half.

 
And lay the cooked egg whites on your muffin halves.
 
Note:  I forgot to toast these, but they were fine as is.....although next time I am going to toast them.  Because I love the texture and taste of a browned bread.

 
Lay on your ham slices....I used one and a half of the thin slices on each, but go more/less depending on your taste.

 
Then add a slice or two of tomato.


And a couple slices of the sharp, delicious white cheddar.

 
Set in under your broiler, leaving the oven cracked open so you can watch them.
If you're like me, this step is super important.  Because otherwise, I'd get distracted and forget about them and burn them and then wonder why I never learned my lesson in the first place.
 
I've learned my lesson. 

 
See....since I was watching them, they came out just in time!
The cheese was melted and bubbly, the ham was a little browned on the ends, and the muffin was toasty but not burned.

 
A great breakfast (or in my case....brunch....since I had it at 11:00 this morning). 
 
 
And for me, I could only eat like one and a half of these.  They're pretty filling!
 
If you have any ideas of what I could add to these, let me know....I'm always looking for ways to make my recipes more interesting! 

Thursday, June 20, 2013

endings...and beginnings

For those who know me, you already know this.  Bear with me.

I'm an emotional, sappy, nostalgic, sensitive, easily-brought-to-tears kind of person.

Movies (okay, even movie *trailers*), a good book, those background stories they show during the Olympics or reality competition shows, touching commercials, great concerts, musicals.......it is a miracle to get through any of these without shedding a tear (or becoming a hot blubbering mess).

Which brings me to part of the title of today's post: endings.

A couple weeks ago, we had our last day of school.  Now, I've been doing this for a while so you'd think I'd be a pro at saying "see ya!" to all of my students....no problem.

You'd be wrong.
For three reasons.
And three words.
The Last Day.

First....even with the challenges and struggles we have gone through this year, I genuinely care for and will miss each of my students.  Yes, some more than others.....teachers, you know what I mean.  When it comes down to it though, I have made a connection with each student.  I love getting to know them as individuals, seeing them grow and change and mature throughout the year.  That's really why I continue teaching- for the kids. 
So....as nice as it is to finally have a break to rest my mind and rejuvenate for next year....I'll miss them.

The second reason-- my end of the year slide show.  An emotional experience that I endure multiple times before even showing it to my students.  I don't have any fancy program that I use....just good old PowerPoint.  And with over sixty slides, and most slides having more than one photo, it takes a while to create.  Going through the pictures I've taken throughout the year is always a fun (yet tedious) task, but once I put them into the slides and set them to music......waterfall of tears. 
My favorite part though is when I show it to my class (twice-- because they always ask to see it again).  I absolutely love hearing them find themselves, their friends, their favorite trips or activities....some laugh, some cry, some just smile....but I know it was worth doing.

And the third reason I'm an emotional mess on the last day of school.....this story.


I don't remember where I found this story, or if I changed the title....but it's something I've been doing as a last day of school activity for as long as I can remember.
Quick summary....a teacher has her students write down something positive about each of their classmates, she compiles those and makes a list for each student, hands them out and never really goes back to the activity.  Years later, one of those former students is killed in Vietnam and she attends his funeral.  Someone finds out that she was his teacher, and she finds out that he kept that list with him at all times....in fact, many of his classmates from that year (who are also at the funeral) also kept their lists.  And of course, this brings the teacher to tears.  And I literally have to stop reading a few times during the story because I get all choked up. 
I'm actually glad that the students get to see me this way.....to show them how much of an impact they not only make on each other's lives, but on mine as well.
You probably have guessed it.....we make lists for each other on that last day.  I want the students to see how others see them, how amazing they are, and how much they have meant to each other.  And of course....I participate in this not only so I can have my own list, but so that I can tell the students what I'll always remember about them.
 
I ended the last day of school with a gift to my students that I found from a link on Pinterest.  It led me to this Teachers Pay Teachers page:
 
For free, you get to download these super cute labels for a student's "Survival Kit for Life"....and then you get to be creative in putting together the kits.
 
First....I went shopping for all the items.
I got almost everything from Meijer....except for the Pop Rocks.  Those were 3/$1 at the Dollar Store!
 
Once I had all of the items, I set up an assembly line and put one of each item (except for the candy- I had enough for two of each for those) in clear cellophane "treat bags"- like the ones you'd use for kids' birthday party treats. 


Here is a close up of what is in each bag, including the tag...


I stapled the tag on the front, added their name and signed mine at the bottom.  So fun!


It was the perfect way to end the last day.....by giving my students a few reminders as they leave me, and each one went with each item like "You rock!" (Pop Rocks) and "Keep smiling!" (smiley face stickers).   :)


To quickly explain the second part of the title of today's post.....beginnings.
As it's the beginning of summer, I have created my long list of things I hope to accomplish in the next couple months.  Just like I did last year- check out that post here.
 
It's always way longer than necessary, but having goals is good and keeps me from having too many lazy days.  Like yesterday when I literally did not leave the house, stayed in my pajamas, and did whatever I wanted.  It. was. amazing.


I'm sure there will be future posts about some of these summer projects....so stay tuned!  :)