Tuesday, July 31, 2012

the month in review....in pictures

If you have been following my blog, you may remember that this time last month I posted thirty pictures to explain the "Photo a Day" challenge I completed in June. 

Well....not only did I decide to continue doing this with July's challenge, but I think I picked up a few friends along the way to join.   So cool!   It's been a blast seeing how everyone interprets the theme of the day, and in a way it helps keep us connected throughout the summer when we're all off "doing our own thing".  :)

I thought I'd play around with my pic collage app on my phone to combine a bunch of my daily pics together, so I won't be posting thirty-one separate photos this month.  Not sure which way is "better" to present them, so I'd love to hear your feedback.   I'm still going to be me and describe the photos, because I just can't leave photos without explanation. 

Here's the list I started with.....courtesy of fatmumslim.com.au


July 1-5


1- Self Portrait:  Taken at the Art Fair in Muskegon-- a summer tradition of my family to go admire the arts and crafts, and of course....partake in the delicious, fried food and fresh lemonade.  A little sad this year though as there was a significant decrease in the number of booths-- hopefully it will be back to normal when the Summer Celebration returns.
2- Busy: I was busy that day downloading 30 pictures for my last photo-a-day post....and busy getting annoyed with how slow my computer is.  Someday.....I'll have a better computer.  Saving up for a Mac!  :)
3- Best Part of My Day: It was a lazy day. A stay-in-my-pajamas day.  A barely-get-off-my-couch day.  And I spent a good amount of that couch time either watching shows from my DVR, or organizing my Pinterest boards.  I don't think I'll be taking two computer-screen pics in a row though....kind of uninspiring, right?  But, in my defense....it WAS a lazy day. 
4- Fun:  Me and my nephew making funny faces.  He's obsessed with my iPhone (as most little kids in my family are-- such a tech-savvy generation they're growing up in, right?)....and really, this is the only way I can prevent him from taking it hostage to play games on it.  I have loads of pictures of me and my nieces and nephews doing stuff like this....silly faces, sad faces, angry faces, creepy faces....you name it, we've made it.  So when Fun was the word of the day, I knew this was appropriate. 
5- On the Floor: Looking up at my new fridge, I sat on the floor and took a quick picture.  This was significant to me that day because I waited SIX weeks to get this fridge.  It was a "special order" and should have only been a three-week wait, but they ordered the wrong one, so I had to wait another three to get it.  Luckily, I love it.....so it was worth the wait! 

July 6-9


6- Chair: The chair at my kitchen table.  I was in the middle of....once again....clearing off all of my counters for the next step in my kitchen remodel process.  It was like this for a couple weeks.  So glad that's done!  I'm so NOT a clutter-lover. 
7- Garden: My flower garden has been a little sad-looking this year due to the heat wave/drought we've had in Michigan, but these pink phlox flowers thrived throughout it all. 
8- Lunch: I picked the first tomatoes from the plant on my deck, and I used one to make a sandwich at lunch that day.  Fresh tomatoes are soooo juicy and sweet!
9- Big: A small part of the BIG mess in my basement that I started sorting through, organizing into piles to either keep, throw away, or sell in a garage sale the next week.  It was a long process....like, a week long.  And that doesn't even include the set up, pricing, and sitting at the sale both days.

July 10-12


10- My favorite color:  Blue.  Between looking up at the brilliant blue sky and the light, puffy clouds and the sun shining....I could not have been more relaxed that day.
11- Letter:  As I was sorting through my bins of keepsakes, I came across many shoe boxes of letters, postcards, drawings, photos, and other little mementos from my childhood and all the way through college.  It was so fun reading through old letters like this one that my sister sent to me when I was away at U of M.  I probably "wasted" a whole night going through these (along with my old diaries-- hilarious!), but it was a great diversion from all the garage-sale-prep-madness.
12- Texture:  Close up of my purse (orange) and wallet (brown).....which reminds me....it's just about time to switch over to a different purse soon.  When you have a collection like I do, you want to make sure you give them all attention at some point.  Just to make sure the others don't get jealous.  I know....I'm a freak.  It's okay, I'm cool with it. 

July 13-15


13- Open:  This was taped on the bottom of our garage sale sign....recycled from the last time we had one at my mom's house....I made it because it had been raining that morning and business was slow.  I thought a bright sign would lure in more customers....and maybe it worked-- I made a good profit with the sale! 
14- Building: On my way home from the garage sale weekend in Muskegon, I took a different way-- off the highway-- for about half my trip.  I wasn't in any hurry, and decided to drive down some country roads I've never been down before.  I highly recommend doing this if you haven't before.  It's relaxing....well, for me at least....to be away from the fast-paced monotony of the highway and business districts....to slow down and drive past farm buildings and fields of animals and crops.  I almost wanted to jump out of my car and run through the fields.....but you never know how friendly the farmer might be to some random stranger running through his property.  Maybe I've seen too many movies....
15- Finger:  Speaking of movies, the next day I went to see one (no shocker if you know me well), and snapped a quick pic of me grabbing one of my vices-- movie popcorn.

July 16

16- Signs:  My mom, my sister, and I took a trip to Chicago on this day....on the way, we saw quite a few signs on the highway for antique malls.  Even though we had a list of places we wanted to go in the Chicago area, we decided to stop at a few of these "malls" to see what they had to offer.  And although it made our trip longer, and we didn't get to stop at IKEA, we decided it was worth the stops.  I got some fun vintage items, and some inspiration for a couple projects. 

July 17-20


17- My Addiction: Nail Polish.  And all of these are the OPI brand.  I'm loyal like that.
18- Plate: I bought myself a new set of plates/bowls/mugs, when really all I needed were the bowls.....they were on clearance, I had a % off coupon, and getting the set of bowls was almost the same price....so really, I couldn't resist!
19- Animal:  At the antique mall, I saw this Garfield phone that reminded me of one my cousin Kathy had growing up.  When you picked up the phone, his eyes open, and they close when you hang up.  So cute.....and a little crazy to me that this is considered "vintage" or "antique"....boy, that made me feel old!!
20- Eyes:  When I was looking for a flash drive, I knew I wanted to get a "cute" one....and when I saw the adorable eyes of this little owl, I knew it was for me. 

July 21-24


21- 9 o'clock (PM):  This was the aftermath of a late dinner of Chinese food when a bunch of my family got together to celebrate my niece's and nephew's birthdays.  Going to the beach, eating, decorating cupcakes, playing games, opening presents, laughing, and hanging with my family.....what a fun day!
22- Upside Down: My nephew makes his second appearance on my July photo-a-day...this time, upside down. 
23- A Mirror: This was the whole taking a picture in a mirror, within a mirror, so you can see about four of me if you look hard enough....
24- A Stranger:  Coming back from a trip to Home Depot with my mom, I said something about needing to take a picture of a stranger.  "How about that guy?" my mom said, pointing to the news van next to us at the stop light.  It looked like he was trying to shield himself from getting his picture taken, so I quickly snapped this one of him before he knew any better.  :)


July 25

25- Heart: During a trip to World Market, I snapped a picture of every heart I could find....this was a sample of them.  And....in a strange turn of events, I bought nothing.  That's almost as crazy as me going to Target and coming home empty-handed.  Almost.


July 26-30

26- Sunshine: On our trip down to Ohio, it was raining for most of the time....and I knew that sunshine was the theme of the day....so when I saw a little sun peeking through part of the cloud cover, I quickly grabbed this shot.  It may not be as pretty as the sunshine pictures others took that day, but I got one when I thought I may need to resort to drawing a cartoon picture of sunshine, so I went with what I had available....:)
27- On the Road: After a trip to do some more antiquing with my older sis in Ohio (we reeled her into our new obsession), we stopped on the way back at Dorothy Lane Market for some yummy treats.  I got my favorite one....the Killer Brownie.  So. Good.
28- Cup: A cup of Coke from Target.  Sudoku.  A good book (not pictured).  After feeling not-so-great that day, and having to opt out of going to a birthday party, this was how I spent most of my afternoon.
29- The Last Thing I Bought: 180 Folders.  30 each in six different colors.  All for 1 penny each. Yeah, I'm a pretty savvy shopper when it comes to finding good back-to-school sales for my classroom supplies.
30- Calm: Since the temperatures have dropped to the 80's lately, I decided to sit out on my deck and read for a while on this night.  It was so calm in my neighborhood, the sky was calm, the wind was calm.....and apparently, it was the calm before the storm......because a huge storm came late that night!

July 31

31- Toothbrush:  I bought this case for my toothbrush....after watching an episode of some talk show a while back (I think it was The Doctors), I was inspired to try it.  When I heard how gross toothbrushes can get-- I mean, you're literally brushing bacteria ON your teeth when they don't get cleaned properly-- I thought, it couldn't hurt to try.  The light apparently kills the bacteria.  And of course, I don't really KNOW if it's working, but it's a whole "peace of mind" thing...and I had a ten dollar credit to use when I bought it, so it was pretty inexpensive.


And now....for those of you who want to join in this month, here's the list for August. 
Just remember....there are NO rules.  It couldn't be any simpler than that, right?!


Photo a Day lists (July and August) copied from http://fatmumslim.com.au/

on my own

In May, my sister bought her own house and moved out of mine, leaving me with an empty room.   And the creative juices started flowing.  I knew that I wanted to convert her old bedroom into a guest room, and use the walk-in closet to house extra clothes and purses.  I craved another outlet for my inner interior-designer, and a guest room was just the blank canvas this artist needed. 

Sidebar:  I vividly remember a writing assignment in elementary school in which I needed to write about where I saw myself in the future.  I revealed that I either wanted to be an actress, an archaeologist, a photographer, or an interior designer-- pretty diverse set of dream jobs, right?  I still think if I wasn't teaching that I would be doing one of those things.  Well, besides the acting gig.  I think that ship has sailed.

Back to reality....

As I said, I began with this empty room:


Okay, it wasn't entirely empty at this point....my old bed was propped up against the wall, waiting for my summer to begin which brought that gift of time.  Time for projects like these. 

Since I didn't have bedding picked out yet, I started with the wall paint color.  I had pinned several color schemes on Pinterest, but ended up "copying" my sister.  Which, as my mom always taught us, is a compliment.  Although when I was growing up and my sister would copy me, I didn't always see it that way.  ;)

After helping paint the rooms in her new house, I knew the dining room color was my favorite.  It's yellow- but what I like to call a "neutral" yellow- not pastel, not a bright, sunny yellow....it's this yellow that complements other colors.  So I told her I was going to steal it for my own house.  Take it as a compliment, Capen. 

One day....right BEFORE the Heat Wave of 2012 started (I learned my lesson from last summer), I decided that this would be the prime day to paint the guest room.  I already had the paint and all of the supplies.....so I got to work- prepping the room with tarps, removing wall plates, etc.


Before-- neutral, beige walls begging for a change


After-- two coats of paint transforms the room


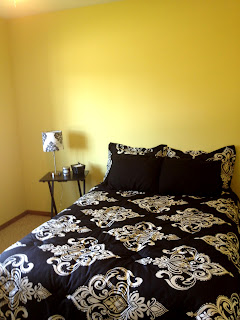
From there, I had a vision of the decor in the rest of the room.....mostly black and white for the bedding and details, with a few pops of color here and there.  Girly and vintage-inspired.

The bedding came first.  I looked at several different stores for what I wanted, and actually found what I wanted in the place I least expected--- WalMart.  So you can probably guess, it was a great price.  And what I really loved (besides the pattern) is that with this being a "bed in a bag" deal, the quality wasn't compromised either.  Bonus!


The black sheet set on the bed right now was bought separately before I found the comforter set, so I have an extra set of sheets as well!

As a frequent guest in other people's houses, I know how nice it is to have something....a table/nightstand/bookcase/etc. next to the bed.....with a light to turn off right before falling asleep, to set my glasses and cell phone on, etc.  So of course I needed to find something for this purpose.  But what I didn't want is to spend much.  I had planned on scouring garage sales for something, but in the end I never needed to start that search.

Enter my favorite store-- Target-- to the rescue.


This is actually a "TV tray" table-- $9 at Target.  Perfect size for a small lamp, candle, and metal basket with paper and pens.  I had all of the "accessories" around the house, and have started looking for something small to add a pop of color and interest to the collection in the future.

The windows had the plain, boring blinds which are fine and functional and all that....but I just couldn't resist looking for something else to soften the look a bit.  I just didn't want to spend a ton since I already bought new curtain rods/curtains for my living room and dining room.

I went with an inexpensive "cafe rod" and lightweight, sheer white curtains.   It is exactly what I wanted.....something feminine, something to let light in, but still keep the privacy a bedroom should have, and of course....something low-cost.


A few other things that fill up the guest room....


A bookcase I brought up from my basement family room.....filled with photo frames and albums.


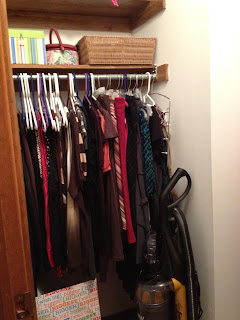
Closet is now filled with my overflow clothing (stuff out of season, rarely worn items, etc.), baskets of purses (which I pared down by about 30% after my garage sale), and a wrapping paper/supply organizer that I recently bought.


This side of the closet....more clothes, other storage baskets/bags, and my vacuum is now upstairs!


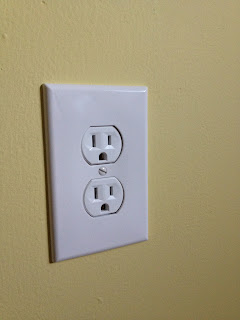
The last thing I did to the guest room is replace all of the outlets and switches.  They were all beige and I wanted them to be white. Huge difference, right?  ;)
Since I was already going to do this in my kitchen, I thought I'd be a crazy woman and just do the entire top floor.  Someday, I'll show you why ALL of them are being replaced.  A hint: wooden.

So my rockin' mom showed me how to do it with my kitchen outlets/switches, and after she had to leave that day, I decided to do all of the guest room on my own.  Pretty proud girl right here.

Once you know how to do it, it's really just a few simple steps.

**What should be obvious, but needs to be said:  TURN OFF the electricity BEFORE starting any electrical work** 
I tested every single switch and outlet before beginning any of the steps below.  This is best done with a partner, so luckily my sister was there to help with that part.

Step one....remove the old outlet or switch, leaving the wires.


Step two.....hook up the new outlet, matching the wires in the same way.
Step three.....Screw the rewired outlet (or switch) into the electric box.


Step four....attach the new wall plate over the outlet or switch, making sure everything is aligned.


Step five....turn the electricity back on and relish in your awesomeness as an amateur electrician. 

So that's where my guest room stands as of now.....although I have a few small projects left in the works-- things for the walls mostly.  I wanted to add some more color to the room, just a few fun bits of my personal style.  A little inspiration from some antique shopping, and some ideas from some Internet shopping.....once those are added, I'll post some pictures! 

Update:  the third kitchen remodel post will come soon.....but I have a couple more details I needed to finish before the final reveal for this summer.....:)


Thursday, July 26, 2012

counters and faucets and lights, oh my!

Yesterday, I started my kitchen remodel "series" of posts with an explanation of the transformation of my kitchen cupboards from boring brown to bright white.  Today's post is about the rest of the changes I made last summer as a result of that first choice- to paint my cupboards.

The bright white cupboards only drew more attention to the eyesore that were my counters and backsplash. Both were this hideous, yellowish-beigeish-outdated patterned laminate.


So after researching the crazy cost of my first choice (granite), I decided I would go with laminate for the counters again.....but my own color choice, and something that had a marbled or granite "look" to it. And I knew that I wanted tile for my backsplash, so that was coming down, too.

After ordering my counters, and getting advice from the Home Depot guy who came out to measure for them, I decided that (with my mom's help) I was going to forgo the extra cost of them ripping out and hauling away the old counters and do it myself.

For anyone who wants to do this themselves, I'd like to say.....if I can do it, you can.
But just be prepared for some bruises, scratches, cuts, bumps on your head, and other minor injuries.  Unless you're NOT like me (completely accident-prone)....then, you should be fine. 

So here's my quick guide to removing counters and laminate backsplash.


Step one....remove the backsplash (if this applies to you....if it doesn't-- count yourself lucky).  This took a lot of trial and error between my mom and I, but we got it all down before the counter guy even showed up to take measurements.  He even told me "if you can do that, you can get the counters out".  Really, all we used was....a hammer, flathead screwdriver, crowbar, and that flat metal spatula thingy you use to spread plaster.  I know....there's probably a technical term for it....but just let me call it the flat metal spatula thingy.  It sounds cuter that way. 

So we just kept loosening it up whenever we could, pulling and ripping it out in pieces, and cheering for ourselves when it was finally done.  Drinks may have been involved in the celebration, too.  ;)


Step two....remove the sink/faucet.  The HD guy explained the steps to me for my own sink, so I'm sure it wouldn't be the same for everyone.  But....it really wasn't that hard, and I'm guessing a little Internet/YouTube research could help you figure that out.  Just don't forget to turn OFF the water supply first.  That's kind of important. 

I decided to keep my sink because it was in great condition, so I just left that out in the garage.  And I didn't do this until the day before they were coming to install the counters so I wasn't without a sink for too long.


Step three....remove the counters! 
This....was where the bulk of my injuries came....as well as some choice words.  Let's put it this way....you may want to make sure that young children are not around when you're doing this.  Unless you're extremely talented in self-control and/or don't swear when you're frustrated.  This was not me. 
Maybe it was because my counters were attached in the wrong way the first time, maybe it's because I've never done anything like this before, or maybe it was because it was the day before they were coming and I was trying hard to get it done quickly.  For whatever reason....it wasn't easy.   But....it's definitely doable.  Like I said....if I can do it, you can!

The main advice I can give you is that it might help to have a stronger person helping with this.  Not to put down myself or my mom, but we aren't going to be winning any arm-wrestling matches either.  We did it, but it probably would be easier with someone that has well-defined biceps.  Which I don't.

And....because I didn't want to pay for them to haul away my old counters, we got it all into pieces that would fit into my trash and threw it all away with my weekly pickup.  My mom rocks the electric circular saw thingy like a pro.  And I was hammering in all of the exposed nails and breaking those laminate pieces down like nobody's business. 

After that, I let the real pros do the rest. 

Installation of my new black laminate counter tops was way quicker than I thought it would be....and it was just ONE guy doing it all!

I love the way the front edges are curved.....my shirts don't get caught on them anymore!


Since I was going to need to call a plumber to hook up my sink again (I didn't want to mess with that and risk having leaks), I decided that I'd replace the cheap, ugly, tiny faucet that came with the house.  Why call a plumber twice for something that can get done in one trip, right?


Before

After


Working on improving the look of the sink made be notice more how it clashed with the light over it.   Also....the main light in my kitchen was always too dim for me, and the color didn't match with the rest of my stainless-steel look I was going for.....and since I was getting some money back from Home Depot (their estimate for the counters was more than the actual cost), I decided to use that money to buy two new lights.

And of course.....Mimzy (my mom) told me that she knew how to install new light fixtures, and so we did!   Not without some difficulties of course, but we finally figured it all out, and I love the difference in style and the amount of light I can now get in there! 


Before

After

And one more thing to mention about the lights....as far as I can tell from all of the searching and shopping I did, there are no "cute" and "stylish" lights out there made for overhead kitchen lighting.  Well, that are in my price range at least.  Everything was either super cute and only took low-wattage bulbs, OR kind of boring (like the one I got) but allowed for a lot of light-- mine takes TWO 100-watt light bulbs.  So I went with boring and practical (but still matching) for the overhead, but cuter and more stylish for the above the sink light.  Compromise!


So after all of that......my summer was coming to a close and I didn't have time to get the tile backsplash taken care of-- until this summer.  So yes, that means I had a torn out backsplash for almost an entire year.  And no, it wasn't my first choice, but I knew in order to complete my vision, I would have to be patient. 

And patient I was.....as you will need to be...for the third installment of this series! 

Wednesday, July 25, 2012

one thing leads to another...

Anyone who has taken on any redecorating or remodeling project knows it's never as simple as you set out for it to be.  (And if you think it is....you're either lying or extremely lucky) 

Once you get an idea in your mind of something you want to change, update, or redecorate....it just leads you into something else that you didn't think of, a step you didn't count on taking as long as it does, a step you forgot about, a higher cost than you had planned, a kink in the plans that almost brings you to tears....you get the picture.

And...if you're like me, it also leads into wanting to change a bazillion other things to "complete your vision".   My kitchen project is a prime example of this.
Because what started last summer as a "simple" idea to get cupboard and drawer pulls/handles for my kitchen cupboards (they didn't have any) led into a two-year-and-counting-long project.  Yes, if I wasn't so busy during the school year (and I had a money tree in my backyard) it wouldn't take this long....but I'm hoping that by the end of next summer I'll finally be able to say....I'm DONE!

For those who have never seen my kitchen.....here are a couple pictures from September 2009.


The only thing I did to the kitchen before moving in was paint the walls from white to green.
Otherwise, anything else I wanted to change would have to wait.  I was pinching pennies a little after getting my first house, so I kept everything else as it came.


Then, last summer I decided I was sick of not having any handles on my cupboards and drawers, so I went on a search for some that I liked.  The problem....the color of these cupboards kind of limited what I could choose.   After looking at numerous stores and not coming up with anything, I made a decision that led into a domino-effect of changes to my kitchen. 

I decided to paint my cupboards.

Boy, was I in for a surprise about how tough that would be....and how long it would take.

Oh yeah....and did I mention that I did this during a heat wave?  I'm super smart that way.  High 90's and high humidity, not being able to use the A/C, painting in a stuffy garage or small kitchen......I probably lost about 5 pounds in sweat that week.  :)

The one thing I didn't think about was how labor-intensive the first steps would take-- taking off the cupboard doors wasn't too difficult, but taking EVERYTHING out of the cupboards and drawers.....that was tough.  Finding places around my house to store these items just added to the challenge.


Doors are off....


Cupboards and drawers are emptied, and plastic is spread out....and cupboards were sanded.


All of the doors and drawers were taken out into the garage and given a good sanding.

There must be a better way to do it, because I totally filed my nails down to nothing from all of that sanding.  Luckily, they grew back.  :)


 Everything was primed and left to dry overnight.


The next morning, I started the first coat of white paint.  The OTHER thing that made this process take so long....doors have two sides.  Which means one side needs to completely dry before you can flip it and put a coat on the other....and when you're doing one coat of primer and two coats of paint.....that's a lot of painting and waiting. 


A few fans worked hard for a couple days while I let everything dry completely in the crazy, muggy mess of weather we were having.


Everything was put back in the cupboards and drawers, new black matte hardware installed, and I even spray-painted the hinges black to match. 

And although it took a full week out of my summer to complete all of this, it was much cheaper than getting new cupboards installed, and I LOVED the way they turned out.  It was just how I pictured it.

But......as I said, one thing leads to another.
And that next step will be revealed in my next post! 


Since this kitchen remodel has been a lengthy process, I decided it would be best to split this into a series of posts and just stick with the cupboards project for my first installment.

Plus, I just love a good "To Be Continued....."
Don't you?   ;)

Wednesday, July 11, 2012

happiness is...

So if you've read any of my facebook or instagram posts lately, you probably know I'm getting ready for a garage sale this week.  This was a goal of mine for the summer in order to clear my dumping-ground (a.k.a. spare bedroom downstairs) and reorganize my storage room. 

And wow.  I have accumulated a LOT of stuff over the years.

Of course, as with everything I do, it is not a quick process.  And while going through a bunch of my plastic tubs over the past couple days, I found myself stopping to reminisce on my childhood, adolescence, college years, and early years of teaching.

One item that I discovered was this:


About ten years ago, I bought this notebook with the idea that I would use it to write down daily the little things that make me happy.....to focus on the positives, and put some perspective on life's blessings.  This came at a great time, as I had just moved to a new city, was jobless for a few months, got a new job teaching middle schoolers (after three years of teaching second graders!), and was still struggling a little with the debt that college put me in......so I guess this was my own form of therapy.  :)

Here are some things that I wrote down in this journal:

Happiness is.....

*seeing my niece laugh at the smallest things, like me shuffling cards
*going for a long walk on a sunny spring day
*riding in my car with the windows down and the sunroof wide open
*finishing up my thank you notes
*fixing a computer problem on my own
*my soccer team winning their game vs. Cross Creek in double overtime
*having the windows open at night....in April!
*mailing out an Easter package to my nephew
*calling Mom
*finding out that I just have a pinched nerve in my leg-- nothing serious like I worried it was
*a good night's sleep-- eight hours!
*working out on my pilates machine
*renting movies
*not working at school all weekend
*balancing my checkbook
*having my voice back for teaching after a few days without it!
*being invited to my brother's for dinner- and seeing my niece crawl for the first time
*getting all of my grades entered in the computer
*fresh strawberries for a morning snack
*cooking a yummy dinner with leftovers for lunch
*going to Michael's for some scrapbooking supplies
*finishing a challenging crossword puzzle
*taking a short nap to get rid of a migraine
*the smell of freshly picked lilacs in my classroom....a gift from a student
*hearing from Joy and making plans to see her soon
*finally organizing my nightstand
*getting some very positive comments on my research paper
*shopping at Target
*hearing the birds chirping outside when I woke up this morning


I thought I'd add a few more, but new ones.   Things from the past couple days that make me happy.

Because even though this has been a very relaxing summer, it's been a packed summer.  Getting projects done, checking off things from my to-do list, running lots of errands, making phone calls, lots of trips to the home improvement stores, squeezing in things whenever I have time....it's busy, but it's a good busy.

I just don't want my summer to fly by....I want to stop and notice and appreciate the little things every day that make me happy.  I want to enjoy every small, seemingly insignificant part of my day while I can.  For teachers, summer is a time to rejuvenate ourselves.  We work hard.....really hard....all school year long.  Summer is the reward.....the bucket of gold at the end of the rainbow.

And since I can't resist making a Top Ten list.....

Happiness is:

1.  Getting packages in the mail two days in a row-- my Stickygrams came- and they're proudly displayed on my new fridge already! 

2.  Having my windows open all day and at night....after the Heat Wave of 2012, it feels great to have fresh air in my house again!


3.  Going through my old keepsakes and finding this gem.....my friend Joy made this for my birthday one year.  We dubbed ourselves the "Wondertwins" in college (and even had matching cheap superpower rings!) and I just love this picture of us "in disguise".  As if you could hide the fun that we brought to the party!  :)

4.  Reading old letters from my friends and family members when I went away to college.  Reading my old diaries.....from middle school, high school, and college.   They.  are.  hilarious.


5.  Finding small items I kept from my childhood.  Like this set of Scratch-and-Sniff stickers that came in boxes of the "monster cereals".  Count Chocula was my favorite, but I also liked Frankenberry and BooBerry, too. 

6.  Seeing the final step in the process of my kitchen tile backsplash.....pictures to come soon! 

7.  Ordering online some prints for my kitchen/dining room.....and seeing my vision for my kitchen remodel all coming together. 


8.  Cleaning out and reorganizing my storage room for the first time since I moved in to this house.
This one area.....is JUST Christmas stuff.  Totally serious. 

9.  Getting an iced capp from Tim Hortons.  Okay.....and a donut. 


10.  Looking up at the clouds on this gorgeous summer day.  Thick, puffy, fluffy cumulus clouds.....vibrant blue sky......love. it.


Hopefully this will inspire some of you to create your own lists, or even just stop and reflect on those little things that make you happy.  It just takes a few seconds out of your day, but let me tell you.....it's worth it.