Monday, July 29, 2013

chevron and stripes and dots

I know....chevron is ev--er--y--where right now.
Some people might be sick of seeing it....some can't get enough of it....I'm kind of in the middle.

Yet....you wouldn't think so after reading this post.
You might think I'm chevron-obsessed.
I would call it chevron-inspired.

In my house, there are just a few small chevron details....a rug in my kitchen, a set of coasters in my living room, a decorative plaque on my guest room wall.  Nothing overwhelming, just a few pops of chevron throughout the house.

And then....there's my classroom.

Three boards in my classroom....see, it's not ALL chevron....there are zebra stripes and polka dots, too.  I love myself some black and white patterns!

The problem started when I decided that my bulletin boards needed some TLC.  Sure, they had fadeless paper on them (an amazing invention for borderline-OCD teachers like me who despise putting up that large bulletin board paper....cutting the right size, making sure it's not stapled on crooked, making sure that there aren't any "bubbles" in the paper...I could go on).  
So while they weren't faded and I didn't *need* to change them, a few things were really bugging me about them and they were looking a little sad.
Plus....I just wanted a change.

Exhibit A:  This one had been "patched up" over the past couple years....it had some food stains on it from being near the microwave table (we have lunch in our classrooms at my school) and rips from a few students being overzealous with "helping" take down things for me.


Exhibit B:  This one had been used so much that there were TONS of staple/push pin holes in it and I really wanted to change out the purple....plus I was kind of done with the fish-theme that I had years ago (if you can't tell-- the borders had fish all over them).
 
 
So after making my objective frames last year, I decided that when I changed the boards I would go with a polka dot/zebra stripe theme. 
Until I saw tons of ideas on teacher blogs about using chevron in the classroom.
So that completed my trifecta of patterns that you see above!


I bought some chevron fabric at JoAnn's a couple weeks ago when it was on sale and I had a coupon....but when I put it on this bulletin board I started to realize it was a little hypnotic.
Not exactly the best thing for a classroom full of energetic kids.
 
My solution....came from Target.
I really think that statement applies so many times in life, couldn't it?
My solution came from Target.
 
 
I didn't want to spend a lot of money, but I wanted something that would cover most of the chevron, that came in black, and that I could keep up (or replace easily) from year to year.
Target had this plastic table cover that fit the all of those requirements!

 
I measured and cut a piece from the plastic that left a thick border of chevron peeking from behind it. 
Hypnotic problem solved!

 
Just to "test it out", I started putting up a few things on the board that I would want up for the beginning of the year.  Since this is going to be my "reading" board, I put up a literary elements wipe off chart, and some of the genre posters that I found here on Teachers Pay Teachers.
 
On the other half, I'm going to create something that I can use as I go through the units in our new ELA curriculum, Reading Street.  If anyone uses this and wants to share ideas with me, I'd love to share what I come up with, too!
 
The other large bulletin board in my classroom (the formerly patched-up blue one above)
got a little chevron-love as well.
Target to the rescue again!

 
Have you noticed how adorable Target's line of wrapping paper is?
I literally bought 11 rolls there the other day (mostly for home, but a few came to school with me).
And even better-- it's like three bucks a roll.
WAY cheaper than buying the fadeless paper.
(sorry fadeless-paper company, but I think we may have just broken up)

 
So you can't really tell from this far shot what the patterns look like, so here's a close up:

 
And because I had lots of extra black plastic table cover left, I created a section of black (with my zebra stripes border) in the middle of the board for something I'm working on....I'll write a post about it once it's done.  :)

 
I am also changing my Star of the Week board from the same one I've had up for years (it was looking a little worn out) and more Target wrapping paper and zebra stripes border came together to become the blank slate for a soon-to-be revamped display for my Star of the Week!
 
 
So you can probably tell that my classroom "colors" are different shades of blue or green with accents of black and white.  The same day that I bought the black & white chevron fabric from JoAnn's, I couldn't resist getting a little more chevron fabric in a different color.
 
This was transformed into (thanks to my mom's sensational sewing-skills) new pillow covers for four throw pillows that once used to be on my couch and love seat at home, and are now part of my reading corner in the classroom.


I have a lot more changes and updates to blog about soon....and probably a few more trips to Target!
 

Friday, July 26, 2013

favorite pins friday

I recently discovered Bloglovin as a way to organize all of the blogs that I like to follow, as well as discover new ones!  Now that August is almost here, and I'm slowly entering my teacher-mindset again, I've been reading through quite a few teacher's blogs and getting a lot of great ideas in the process.

Today, I saw this "Favorite Pins Friday" post from Fourth Grade Flipper, one of the blogs I follow.  She is linking up with The First Grade Parade to share the Pinterest love with everyone in Blogland. 

 
So basically, it's just a chance to share some of your favorite pins from Pinterest, linking them back to the original person who posted it, and explaining a little about them.
 
You're probably "supposed to" stick with what you pinned for that week, but being the first time I've done this, I think I might give myself a little wiggle room.  :)
 
Since I'm starting to get back in my classroom, I'll start with a few from those boards.  If you're not a teacher, scroll down to find some non-teaching ones!
 

TEACHING PINS


After seeing this pin from Timeouts and Tootsie Rolls, I was like......oh...my...goodness!!! 
This might be the solution to an enormous source of annoyance for me.  
As small as it might sound, dealing with student desk name tags is such a headache. Making them, cutting out the contact paper, putting them on, having them messed with/ripped off within days, and then being left with over twenty desks with no names on them....ugh.
 
This is the answer....and I have already bought two of these magical pens.
Can't wait to start labeling the desks!!
 
 
This jobs board....from a post from Clutter Free Classroom....is the inspiration for a new approach I'm going to take with classroom jobs this year.  Once I get it all hashed-out and put into action, I'll write a post about it.   Oooh, the anticipation.....
 
If you just can't wait, go to the link above to read about how this teacher does it. :)


This is a FREEBIE from Teachers Pay Teachers....thanks to the teacher at Elementary Endeavors for sharing it!   I've already printed it up, ready to be laminated for my classroom wall.
 
Now that I'm getting into my room to start setting up a few things, I decided to change up some of my bulletin boards/wall decorations that have been the same for a few years.
This poster goes well with the color/design theme I'm incorporating into my room.
I'll be blogging about that another time....lots of pictures to upload and edit.  :)
 
Speaking of freebie posters, here's another one from The Hands-on Teacher in First.
 
 
For both of these, it's not only the chevron that caught my eye, but it's also what they say.
I think with the shift to Common Core this year, it's really going to be important to help the kids shift their mindset as well.  A few reminders on the wall to refer back to might help.


I love this idea of the "Mystery Walker" from the teacher at What Happens in First Grade and will definitely be incorporating it into my classroom management this year. My class is usually pretty good in the hall, but there are times when we are transitioning from one class to another and they need to wait around...I'd also be paying attention to that "waiting time" as well.
Now I just need to come up with what the reward will be for my fourth graders.....
Any suggestions would be welcome! 

 PERSONAL PINS


And just so you don't think I'm only pinning teaching-related things.......here are some to prove you wrong.  I'm a bit of a pin-a-holic actually.
 
I really love the blog I Heart Organizing, probably because (a) I'm an organization freak, (b) she does a lot of DIY using inexpensive items, and (c) her stuff is so darn adorable.
 
 
This was one of the more recent pins I found from her blog. I love the idea of combining reusing items you already have, making them useful and cute. 
Those are cereal boxes, people......covered in cute paper and used as drawer dividers.
LOVE.
 
Another blogger I follow is The Pioneer Woman, and now that she has her own show on the Food Network, I love her even more.  She always seems so down-to-earth and has great ideas that even us non-moms and non-ranch-wives can use!  :)
 
 
Recently, she had an episode that was all about freezer cooking.
It was one of my favorite episodes of her show.....and this pin was a link to the blog post that she wrote about it.   Lots of great tips there!
 
Okay....so while this is related to teaching, it's actually was inspired by something on my DIY board.  I have a bookcase in my classroom that is inexpensive and the backing fell off as it was being moved over the summer.....enter this idea from a pin:


While I'm not actually using fabric like this blog post suggests, the idea inspired me to cover the back of my bookcase with some cute contact paper that I got at Home Goods the other day.  Since I need to reattach the backing, I figured I should make it prettier at the same time.
 
Speaking of DIY....I've been learning more about using spray paint on projects this summer....and I came across this pin that I am definitely going to try in the future. 
 
 
Although I'm not so sure if you can find these at the dollar store like the person who pinned this suggested.
Note:  the original post does not say that this was found at the dollar store....I think someone added that when they pinned it.
 
Lastly, I'll leave you with one of the most recent quotes from someecards.com that I pinned:
 
Truth.
(and now...I really want to go to Target....okay, when do I not?)
 
If you're a blogger, feel free to share a link in the comments below if you ever do a Favorite Pins Friday, or just if you think that your blog is something I'd be interested in following!
 
Also....if you know how I can link from a picture directly to the blog, instead of using the text link, let me know.  I have the "pin-it" button on my pictures now, so I wasn't sure how to make that work. 


Monday, July 15, 2013

little changes

With summer projects in full swing, I have a lot of things started or in the planning stages, but not much is actually done.  This worries me a little....mid July is kind of the halfway point for summer, and I typically start thinking more about school stuff once August hits.

I know...I should enjoy every bit of my summer vacation and stay away from work for as long as possible.  That's easier said than done.

Because....I'm a huge dork who loves my job.
It could be worse.  :)

To motivate myself to keep going on my home projects, and to mentally check some things off my Summer To Do List, I'm going to share a few small changes I've made so far.

First of all, let's just say that my poor bedroom gets neglected every year whenever I renovate or change up the decor in my house.  To be honest, it's probably because it's not a "common area" of the house, and I like to decorate not only for me but also for anyone who comes for a visit.
But....I think next summer I'm going to give it a little more attention.  It's been a good sport so far.

I already wrote a post a couple weeks ago about a small change that I made in my guest room- decorating the wall with some frames and antique shelves that I spray painted. 
You can read more about that process here


The other room that I've made some updates in, nothing huge or expensive, was my living room.
There was nothing really "wrong" with my living room.  It's functional, I have lots of storage, and nothing needed to be replaced.
 
It was just a little....well....blah.
Neutral may be a better word.
 
My couch is dark brown, all of my furniture is very dark wood, the carpet is the typical neutral color, and the walls are light brown. 
The one "colorful" piece in the room is my loveseat....a crazy light green.
I kid.  Yes, it's actually green, but it's not crazy.  Very subtle.
 
Here's how it looked back in the fall of 2009 when I moved in to my house:


Crazy to see this picture....my dining room isn't green anymore!
Check out that transformation here.
 
Since then, I've added a new coffee table, a new flat screen TV, and a shelving unit with lots of baskets for storage.
 
But still.....it's all very....brown.


Last summer, I also took down the ugly "wooden-looking" vertical blinds from my front window and replaced them with this curtain rod and somewhat neutral pattern on the curtains.  But....it wasn't brown.  I was making a little progress!
You can't tell from this picture, but the leaves are actually a dusty green-blue color.  They look a little gray here.  
 
This summer, my goal was to add some color into my living room....and a little more interest and style in the process.
 
Here are a few of the small changes I've made.
Like I said, I wasn't making any huge investments here.....just moving things from one room to another, or buying a few new items to change the overall feeling of the room.
 
Before....all brown or beige accents on top of my dark brown storage unit (which also has dark brown and tan baskets, so that was kind of boring).
After....the small lamp was replaced with a bigger one (lamp base on clearance at Meijer, lamp shade from Target), and I added a few color accents that I purchased recently- all on sale of course.  The blue frame is from TJ Maxx, the vase was from Michaels, and the "orchid" is from Kohls. 
Yep, it's not real because I've already killed the real one I got from a student this year- I'm horrible with houseplants.

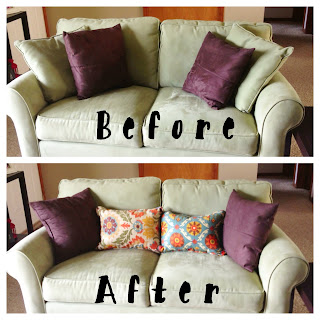
Before....last summer, my green loveseat got two brown throw pillows to add to the matching green ones that came with it.  Still very neutral.
After....two colorful pillows replaced the green ones.  The different size and patterns/colors complement the brown pillows and loveseat much better.  And, let's face it....they're more interesting.
Both of these were from either Home Goods or TJ Maxx....I can't remember which one.


Before....I've had these two framed photos on my wall since I moved in.  I bought them both from an Art Fair before I got my house and just loved them.  However, having two small frames on this wall seemed a little off scale-wise.
After....I found a similar photographer at an art fair this summer, and bought a larger print to frame and put in the middle of the two smaller ones.  I was so lucky that I didn't even need to reposition the small ones- there was the perfect amount of space left in between them.
Plus, the frame I bought (which was a really hard size to find) was very inexpensive at Michaels (it's actually a poster frame, but it worked even with the matted print) and they were buy one, get one free so I have another one for a future DIY project. 

Before....right by my front door is a console table that I bought from Target right after I moved in here.  I loved how it filled that space, but what I put on it wasn't too exciting.  Again, very neutral items and a tiny lamp.
After....another (larger) lamp base from Meijer and lamp shade from Target and a new colorful frame from TJ Maxx add some needed color here.

 
Before....last summer, my brown couch got two patterned throw pillows to add to the matching brown ones that came with it.  These at least had some color, a dusty blue that complemented the color in the curtains.
After....I found these large blue patterned pillows at Kohls to replace the brown ones.  The larger size goes better with the scale of the couch, plus they aren't flattened and camouflaged by the couch like the old ones.
 
Note:  That orange tray and adorable chevron coaster set (both from World Market) and red vase (from Michaels) were also added to my coffee table this summer.  More "pops of color"! 
And I did consciously add in blues and oranges to my living room since those are the two predominant colors in my kitchen and since the rooms flow together I wanted them to complement each other better.  I'm pretty happy with the results!
 
My summer goal....to add color and interest to my living room, without breaking my budget....has been met.  Mental check!
 
Now.....onto my "big" project of the summer.....the bathroom!

Sunday, July 14, 2013

summer comfort food

I turned my air conditioning on today for the first time all summer....for two reasons.

1. It was in the 90's today and is supposed to be for the next few days...and while I'm usually a "fresh-air-and-bear-with-the-heat" kind of girl, trying to sleep when it's muggy and in the 70's is not my idea of fun.  So I caved.

2.  I had bought some veggies at the store the other day with a plan to make up a new recipe with them, and turning on the oven was NOT going to happen without some relief from the heat.

So, basically....today's recipe post was inspired and made possible by me turning on the A/C. 
And my love of comfort food.

In the summer, most people lean towards "lighter" vs. "heavy" comfort foods.  Instead of a hot, creamy, gooey lasagna....we might make a cold, simple pasta salad.   I'm kind of "in the middle" when it comes to my summer comfort food.  I still like warm food, but nothing too heavy. 
This recipe fits that description.

Here's how to make my....

Roasted Vegetable and Chicken Pasta Toss


*Side Note:  This could easily be made vegetarian by omitting the chicken....I just (a) love chicken and (b) had some defrosting in the fridge today.*

First, we have the ingredients:

 
Pasta (I used whole grain penne- about 3/4 of a pound)
Veggies:  garlic, onions, zucchini, yellow squash, red bell peppers, and grape tomatoes
Olive Oil
Salt and Pepper
Grated Cheese (I used a blend)
 
Not Pictured:  Chicken (I used about a pound of chicken tenders) and herbs (more about that later)


First step....preheat the oven to 400 degrees.
If you want an easy clean up, line two cookie sheets (the kind that have sides) with foil.
I used the amazing foil that has one "non-stick" side. 
 
The next thing you want to do is roast the garlic.  This takes the longest, so you want to make sure it goes in before any other prep.  You could even do this ahead of time.  I roasted three heads but was only going to use two.  The other one is in a paste in my freezer for a day in the future when I really want some roasted garlic but don't have the time to make it.
 
Ah....roasting garlic.....once I learned how to do this I was hooked.
If you've read my recipe posts before, you know about my infatuation with garlic.
And while I'm all for grating or mincing garlic to add it to recipes.....roasting it just gives it such a different yet equally delicious taste. 
 
Okay....love letter over.
Back to the recipe.  :)

 
First, you need to cut off the tops of the garlic heads (not the side with the roots).  I cut off about half an inch down, but it really depends on the size of the bulb.

 
This is what it should look like.
Then, I peeled off some of the outer layers of papery "skin" from the bulb, but not from the actual cloves themselves.  Just basically until you can see where the cloves separate. 
This is not a necessary step....I just have found it's easier to get every roasted clove out when I do this.  But you can totally skip this step and it will be fine.


Put them all on a large piece of aluminum foil and drizzle them with olive oil.

 
Sprinkle with salt and pepper.

 
And wrap them all up in a "pouch".  I put the pouch on a pie plate for stability, but you can actually put this right on the oven rack, too. 
I roasted mine for about 45 minutes, but the cooking time will vary slightly depending on the size of the bulbs.
 
The next step.....prep the other veggies for roasting. 
These don't need as much time as the garlic, but I roast them at the same temperature (400) so I probably put them in the oven for the last 20 minutes.  Again, the time you'll need will depend on the size that you cut your veggies and how much you use.

I cut up two red bell peppers, first in strips that were about a half-inch wide, then into chunks.

 
Then, I cut the ends off my zucchini and squash and cut those both into pieces that were similar in size to how I cut the peppers.

 
Did I ever mention that I love chopping? 
So much fun.
(I'm not being sarcastic....I really do love chopping.)


I wanted to get an orange and yellow bell pepper to make this even more colorful, but they weren't looking too great at the store.  Mushrooms would be good, too.
Lots of possibilities for next time!

 
More chopping....I chopped up two small onions.

 
One of the onions was mixed in with the chopped veggies, then tossed with olive oil/salt/pepper on the cookie sheet.

 
The other onion was thrown together with two pints of grape tomatoes, olive oil/salt/pepper....and some herbs.  Which I forgot to take out for the first "ingredients mug shot" so they get their own special photo.

 
Since these were going to be the base for my "tomato sauce", I went Italian with my herbs-- parsley, basil, and oregano.  If you're lucky enough to have fresh herbs growing at home, you could definitely use those.  You just wouldn't put them in at this point, but instead wait until the end.


At this point, I put the two pans of veggies in the oven with the garlic, and just kept checking on them until they were ready.  It was about 20 minutes.
 
While everything was roasting away, I prepared the chicken and pasta.
 
I cut up the tenders into bite-size chunks. 
This....is not my idea of fun chopping.  Raw meat is gross.
But cooked meat is yummy.
(sorry vegetarians and vegans....I'm a meat lover)
 
 
And added the chicken to a pan that had some olive oil and a pat of butter melted.  A little salt and pepper to season the chicken, and then just sauté away!

 
Once the chicken was started, I dropped the pasta into the boiling water.

 
And once everything was cooked and ready.....I started to assemble the pasta toss!
 
The roasted garlic came out first....and I let it cool down for a while.
If you try to squeeze it out too early, you'll definitely burn your fingers.
Learn from my mistakes.

 
Doesn't this look DEEE-LICIOUS?!

 
IMPORTANT:  Before you drain your pasta, reserve some of the starchy cooking water.  You'll be using it for your sauce.  I probably took a cup or cup and a half out, but take out more to be safe.  You don't have to use it all, but once you dump it, it's gone.

 
See how the tomatoes look all shriveled up and there's a lot of juices in the pan?
You want that.
It makes for a fantastic sauce.

 
And not to be outdone, here's the other pan of tender, roasted veggies.
YUM.
 
Here's how I made the sauce:

 
After draining the pasta, I used the pasta pot to start the sauce.
First, dump ALL of the tomatoes/onions/juice from that pan into the pot. 
Add some of the starchy water and use a potato masher (carefully- it will spatter) to squish the tomatoes and make a chunky sauce.
 
But wait....there's more....


Remember that gorgeous roasted garlic?   Squeeze those beautiful cloves right out of their skins and into your sauce.   I used two whole heads of garlic, but you could use anywhere from 1-3 depending on your love of garlic.  I really should have used three.  :) 

 
Mash the garlic into the sauce.

 
Add in the other pan of the roasted veggies, and the chicken. 
If it's not "saucy" enough for you, add some more of the cooking water.
 
If you've been seasoning as you go, you really shouldn't need to add anything at this point....but take a taste just to be sure.  Even the best chefs get sent home on "Chopped" because they didn't add enough salt.  Seriously, do they not taste their food as they go??
 
With a little sprinkle of grated cheese on top, and you're done!

Now that's MY kind of summer comfort food.

 
And really.....it's pretty healthy, too....bonus!!

 
Enjoy!