Thursday, August 29, 2013

bathroom transformation....part one

My big project of the summer is done.....for now.

I may need to make a couple other changes, but hopefully those can wait until next summer.

Two reasons:  money and time.  
No shocker, right? Isn't that really why most people put off home projects?

Here is what my bathroom looked like back in the fall of 2009...

Sorry....this is the best picture I had taken when I first moved into my house.
Notice the fabulous hideous WOODEN switchplates.
Yeah, they matched the cabinets.
Awesome.

 
The most I could do to the bathroom at this point was use what I had in my old apartment bathroom....I literally spent nothing on it at this point.
 
And it stayed this way until last summer when I changed the faucet out.
This was the first step to developing my vision of a new look to my bathroom...
 
Look closely and you'll notice the WOODEN handle on the old faucet.
Seriously, wood must have been hugely popular in the late 80's interior decorating.
 
Now...onto this summer's changes!
 
I had considered keeping my old mirror up and framing it, like I've seen on Pinterest so many times.  However, after researching it I thought it seemed like more work than my skills would be able to complete.  So, after a trip to a home improvement store, I found a great framed mirror that was the right size, the right color, and the right price.
In fact, I had a gift card that covered the cost of the mirror- so the price was FREE.  :)
 
The first step was to take down the old mirror.
After reading up online for tips on how to do this, I was a little hesitant to do it myself.
But....I decided to go for it.
 
I prepared for the worst case scenario and duct-taped up that bad boy first....
 
 
I don't know if you can tell, but I also taped flattened cardboard boxes over the sink/counter top.

 
Of course, I couldn't take pictures of the process of taking off the mirror itself.  I was a tad busy....well, taking down the mirror and hoping not to drop it.
 
My sister came over to help.  This is of course not a job for one person!
Luckily, the mirror wasn't glued to the wall, so all we had to do was loosen the screws on those plastic hanger thingys.  We started with the top ones, and only had to slightly loosen the bottom ones before simply lifting the mirror off the wall.


After taking out the screws, I found that there were anchors in the wall and researched the best way to get them out.  Since I couldn't pull them out, I placed a flat head screwdriver over the anchor, and lightly tapped the anchor until it actually "sank" into the wall.

Which of course.....left some huge holes in my wall.


And this led to a trip to Home Depot....one of many trips I made there this summer.
This time was for a spackling paste.
I loved this one because of the color-changing property. 


It starts out pink.....and when it's white, it's ready to be sanded.
 
Which of course, I didn't take a picture of because really how exciting is it to see someone sanding white spackling on a white wall?
 
So, after prepping the wall my next step was to wash all of the walls, the ceiling, and the cabinet.
 
Just like my kitchen cabinets, I didn't have any hardware on the doors and drawers and the color was definitely not my style.

 
So I took the drawers out, the doors off, and cleared everything out of the bathroom.
Always a fun task- emptying cupboards.
Luckily, a couple weeks before I had gone through and decluttered in here so it was pretty organized.

 
I had set up a table in my dining room as a painting station, but once I started sanding I realized it would be too messy to do inside.

 
So out on my deck I went....and I used fine-grained sandpaper to roughen up the drawers and both sides of the doors.


After wiping down the sanded pieces, I brought them in and set them up on these little cuties I read about on some blog.....they're called Painter's Pyramids.
They're supposed to allow you to paint both sides of something without waiting for it to dry.
I'll talk more about that later.

 
Here's what I used to paint the cabinet-- Behr Premium Plus (with the paint and primer in one) in semi-gloss enamel...I think the color was called "Thick Chocolate". 

 
So, I put the first coat on everything, including the frame of the cabinet (below).

 
And here's what happened when I let it dry and flipped over the doors.
 
I guess those pyramids moved around a little when I was painting the other side because there were these little "scratches" on the flip side.

 
So for the second coat, I let one side dry before flipping it over to paint the other.
I guess the pyramids are good for holding up something to let it dry on all sides, but when you have the possibility of it moving around and getting scratched up, I would suggest waiting.

 
Here's what it looked like after Day One.  Two coats are on the cabinet, all of the outlet/switch plates are taken off, as well as all of the other things on the walls (towel rods/rings/hooks) and painters tape is ready for Day Two.
 
Which.....will of course be part two....coming soon!  :)

Wednesday, August 14, 2013

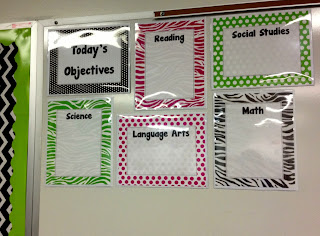
objective frames update

When I posted about making my daily objective frames last summer, I had NO idea how "big" that post would get.  


As a little newbie blogger, just learning as I go, to see one of my posts get over 100 pageviews is an exciting milestone.  It affirms that there are people out there reading what I'm writing, and as I'm sure any blogger will tell you, that means a lot.

This post.....has, as of today, had almost 40 THOUSAND pageviews. 
I kid you not.  Mind-boggling.

I do attribute a lot of those views to the power of Pinterest.
I "pinned" my post, which was inspired originally by a pin I saw, and from there it must have just had some sort of crazy pin-domino-effect. 

A few other very fun things have developed after posting about that project....

*The original inspiration photo had no link attached to it, so I couldn't give credit to the pinspiration.  Until Jillian found my post and I was able to give credit where credit was due!

*A few other blogging teachers commented on my post letting me know that they not only made their own versions of these frames, but blogged about it....and linked back to my little ol' blog.  So sweet!

*A TON of readers asked for copies of the documents I made on my computer for the frames.   After sending out about thirty different emails, and not being able to figure out a way to link a PDF document to a blog post, I caved and opened a Teachers Pay Teachers seller account
If you go to the link to my store, you'll see that I not only have the vertical and horizontal frames (with many additions as suggested/requested by other teachers) for free, but I now have TWO more inexpensive products that I added on today!
     
  • My black circle labels (link to TpT) started out as just cubby numbers, but I added a few other things to make the product more versatile for teachers who may be interested in it.


  • My blue chevron labels (link to TpT) started out as a way for me to revamp the things I labeled all around my classroom, organizing the items in cupboards, drawers, and shelves.  Again, I added a few other things to the set to make it work for other teachers.


  • I also have another product that is so close to being ready....look for a post about it soon!


And now onto the update....

Over the summer, one of my beloved frames either fell or was knocked down during the cleaning process.  In hindsight, I probably should have taken them down for the summer. 
Oh well, lesson learned.
Actually.....I'm kind of glad that it happened.....because I got to update my frames to something I love even more!
 
Magnetic Frames!

(sorry for the glare....my overhead lights made it hard to take a good picture)
 
 
So, when I made a trip to Michaels to pick up a replacement frame, I was sad to find that they didn't carry that brand anymore.  However, I found this gem.
At about 3 dollars a piece, they are slightly more expensive but definitely for those commenters who were worried about having glass in the classroom, these are the perfect solution!

 
(close up in case you wanted to see the specifics)


Check out those magnets on the back-- these aren't going anywhere!
 
 
And since I already had made the papers, assembly was SUPER quick and easy.
Simply slip the pages in...

 
Take down the old Command Strips....you're no longer needed. 
Thanks for your hard work last year.

Reposition everything in place on the board.
 
 
And just because I can't leave well enough alone....I broke out my favorite black and white polka dot craft tape (like washi tape) and framed my frames!

 
I've never been so glad to see something of mine broken before!  :)
 
If you haven't read my first post on how to make the frames, here's where you can get the PDF documents for the labels inside the frames-- go here (for vertical frames) and here (for the horizontal frames).
 
Here's to hoping that this post gets over 100 views.....time for Pinterest to work its magic!  :)

Tuesday, August 13, 2013

liebster award...sharing a little blog love!

Kristin over at the blog This Old Art Room was sweet enough to nominate me for a Liebster Award!


Of course, being a newbie blogger I had no idea what that meant so I hopped over to her blog to find out what this was all about.  Then I did a little more research because I thought it was such a fun, warm-fuzzy kind of recognition.  Not really an "award" per se, but more of a "keep up the good work and remember someone is reading your stuff" reminder.  No matter what, it has all good intentions and I intend to keep it rolling.

One blogger, Sopphey Vance, really dug deep and tried to discover the origins of this award.  You can read her blog post about it here

The Liebster Award is given to up and coming bloggers who have less than 200 followers. Liebster is German and means sweetest, kindest, nicest, dearest, beloved, lovely, kind, pleasant, valued, cute, endearing, and welcome.  Pretty long list of adjectives there, but all together pretty positive as well.

It is given out to bloggers who have less than 200 followers, most likely as a way to support and encourage them to keep blogging!  If there's anything I learned from blogging so far is that if you feel supported and encouraged, you are more likely to keep doing it.  I know personally that once I realized people were (a) actually reading my blog and (b) getting something useful out of it, I knew that I was going to keep it up.

So here are the rules I was given to follow if I chose to "accept this mission". 
(Ha! That totally reminds me of Mission: Impossible....please say you're with me)

Back to the rules....

1. Link back to the blog that nominated me.   (The link to Kristin's blog is at the top of this post!)
2. Answer the questions posted for me by my nominator.
3. Share 11 random facts about myself.
4. Create 11 questions for my nominees.
5. Nominate 5-11 blogs with fewer than 200 followers. 
6. Contact my nominees and let them know that I have nominated them.

Here are the 11 Questions Kristin gave to me:

1.  What is your favorite food?
Italian food....I love all kinds of pastas, pizzas, and anything with garlic and/or pesto!  Let's just say it would be very difficult for me to go on a no-carb diet.  :)

2. What do you collect?
Accessories!  Purses are my biggest weakness (I have six baskets of purses in my guest room closet- I think at last count I had over 50), but I also love buying scarves, necklaces, watches, rings, bracelets...basically anything that can dress up an outfit!
 
3.  What did you want to be when you were little?
Actually, I pretty much always wanted to be a teacher except for that one year in high school when I thought I wanted to be a lawyer. Crazy.  I also had dreams when I was younger of being a famous actress, or an archaeologist, or an interior designer.  Yep, when I was a kid I actually knew what an archaeologist and interior designer were!  :)
 
4. What is your biggest pet-peeve?
As a teacher, my biggest pet-peeve are pencils.  They break, kids lose them, they don't have one, someone stole theirs, they pop the erasers off, they drop all of their pencil shavings on the ground.....I could go on.   I often joke around with kids that I wish someone would invent the everlasting-never-needs-sharpening-or-replacing-pencil.
 
5.  What is something you've always wanted to learn?
I've always wanted to learn how to skydive, how to sew/crochet well, how to speak another language fluently, and how to play a musical instrument.
 
6.  What is your favorite movie?
I love movies way too much to choose one....sorry, I know that's a total cop out on this question.  Literally though, I go to the movies on an average once a week and I've seen SO many outstanding movies.  Last year, I literally saw all (nine) movies that were nominated for the Academy Award for Best Picture.  That's why I can't pick!!
 
7.  What would be your ideal Saturday night?
Either being with my family or friends.  If I'm with my family, it would be hanging out, playing games, eating, laughing and being goofballs.  If I'm with my friends, it would be hanging out, maybe having a few drinks, eating, laughing, and talking for hours.  Sometimes I love going out to a bar or dancing or a party, but for the most part I like being around smaller groups of people where you can just be yourself. 
 
8.  Are you a dog or cat person?
If I had to choose, I'd be a dog person because I loved all the dogs we had growing up....but honestly, I don't have any desire to have a pet myself.  I've lived with both cats and dogs, and it's just not "my thing" I guess.  I have a very sensitive sense of smell, and let's face it....animals stink.
 
9.  If they were going to make a movie about your life who would play you?
Well...since I love movies so much this is again a very hard question to answer.  I think I would want someone like Jennifer Garner, not because I think she looks like me because she's so down-to-earth and that's really close to my personality. 
 
10.  Did you play sports?
I played soccer all four years of high school, and soccer and volleyball (indoor and outdoor) on rec teams in college.  Now...I'm too out of shape to do either of those.  Maybe someday.... 
 
11. What is your favorite creative activity?
I definitely see blogging as a creative activity, but I also really love doing DIY projects around my house (painting, decorating, repurposing objects) as well as fun creative projects in the classroom, many of which I've blogged about!  I also love creating things on the computer (using Publisher) for my classroom, and will hopefully start selling some of them on Teachers Pay Teachers.   At one point in my teaching career, I considered going back to school to study graphic design so I could actually do that for a living (this was before TpT), but I realized I would miss my students too much!

Okay....and now 11 random facts about me.

1.  Since I go to the movies so often, I have a "Celebrity Card" with the movie theater's rewards program.  I like to pretend that it's cooler than it is, but really I just love the freebies I get.

2.  I love going antique shopping.  I could literally spend all day in one of those huge antique malls.  It's so fun to search for little treasures, but mostly I just love seeing all of those "vintage" collections.  I put vintage in quotes because some of those things are from my childhood and I don't think I'm old enough to be labeled as vintage yet!

3.  I have never had a professional manicure or pedicure.  I know, the girlie-girl in me is ashamed.  But when I can do it for myself for way less, I'm okay with that.

4.  I am extremely ticklish, and I bruise easily.  I don't know if they're related, but somehow in my head I thought they should be in the same category.

5.  I'm addicted to caffeine, but can't drink coffee.  Which is why I drink (too much) pop every day.

6.  I can not wear anything with leather against my skin.  I get a serious allergic reaction in the form of a large, very itchy rash.  Not being able to wear leather sandals and dress shoes without socks has seriously limited my wardrobe choices in the warmer months at work.

7.  I bought a house (by myself) almost four years ago.  It was the scariest, smartest, and most rewarding decision I ever made. 

8.  I own and have seen every season and episode of Gilmore Girls and The X-Files.   Even though those two shows are extremely different from each other, they are my two all-time favorite shows.  Which shouldn't surprise you knowing the eclectic variety of TV shows that I enjoy.

9.  I was born in and have lived in Michigan all my life, but my favorite baseball team is the Chicago White Sox.  It all originates with my dad who used to listen to baseball on the radio and the Chicago stations came in better than Detroit so he ended up being a Sox fan.....which of course meant I became one. 

10.  I only applied to one college during my senior year of high school- the University of Michigan.  For my whole life, that was the only place I wanted to go.  I had no back up plan in case I wasn't accepted.  Good thing I was! 

11.  My favorite smell is the smell of the beach.  Lake Michigan to be exact.  It just reminds me of home.  Well, that and the smell of my mom's homemade apple pie.  :)

Questions for my Nominees:

1. If you could travel anywhere right now, where would you go and why?
2. What is your favorite guilty pleasure?
3. When you get a day (or for you parents, an hour?) to yourself, what do you like to do?
4.  If you could only pack three beauty products for a long trip (gasp!), what would they be?
5.  What is the best book you've read recently?
6.  Do you ever wish you were in a different career?  If so, what would you dream to be doing?
7.  If you had to pick one meal to eat the rest of your life, what would it be?
8. What is one of your favorite childhood memories?
9.  If you could live during any other decade/period in history, when would it be and why?
10.  When you go on vacation, would you rather be adventurous or relaxing (like on a beach)?
11.  What are three things you would like to be remembered for?

My Nominees:

1. Jackie at My Sunny Moments
2. Lindsay at A Boy, A Brunette, and a Baby
3. Calli at Living My Best Life
4. Teaching Tidbits and More with Jamie
5. Ali at Teaching Powered By Caffeine

Nominees....please let me know when you write your posts.  I can't wait to hear your answers!

Thanks again to Kristin for the award....this was a lot of fun!  :)

Monday, August 12, 2013

monday made it: classroom jobs board

With all of the little projects I've been doing for my classroom lately, it wasn't hard to find one to write about to join the Monday Made It by Tara at Fourth Grade Frolics.
I'm getting a little addicted to all of these great teacher linky parties....they're a fun way to blog hop and learn some fabulous new ideas!  :)

 
One of the new changes I made this year was to revamp my classroom jobs.  Not only what the jobs board looks like, but the jobs I'm giving the kids, how they're getting the jobs, how often they're changing jobs, and how to move the responsibility from me to them.
 
 
There were three things that I took away from reading this post:
 
1.  Instead of changing classroom jobs every week, and making sure that every student had every job at some point during the year....students have a job for a longer period of time- a trimester, semester, or marking period.  This gives them an adequate amount of time to learn their job well and get into the habit of actually doing the job (this was the struggle I had most- with students forgetting their jobs!).
 
2. Don't assign jobs until you know the students better...wait a few weeks so that you can best understand their personalities, strengths, and needs in the classroom.  For example, if you have a student who needs to have a "get up and move" break once in a while, maybe a "messenger" like job would be a perfect fit.  They have a purpose- to deliver something to the office or another teacher- and they get a movement break. 
 
3.  When it's time to switch jobs, students train each other.  So whoever was in charge of filing for the first trimester will train my second trimester filers.  The responsibility transitions from the teacher to the students.  Love this!!
 
Taking all of this in, I decided to go with this new philosophy, but I needed to add more jobs and my old pocket chart wasn't going to work.  So.....of course....I made a new one.  :)
 
Here's what new Jobs Chart looks like:
 
 
And here's how I put it together....
 
First, I made the sign for the top.   I loved how in the post I read, the shift went from "here's what we need to do" to "here's what we're responsible for".  So I went with that idea and made a sign to make that clear.


Then, I printed up labels for my job cards.  I used clear labels because I really wanted the adorable polka-dot envelopes to stand out.  I laid out the pockets on a table to create the color pattern first.


Then, I carefully stapled everything onto the black background that I had created when I put up my new bulletin boards a couple weeks ago.
 
 
And when I finally do assign each student their job, I'll simply put a large craft stick with their name on it inside that job's envelope.
 
 
Since I have 29 students and only 20 jobs, that will obviously mean that some jobs will be for more than one student.  Which is okay, because honestly some of them need more than one to do it well.
 
I'm super excited to implement this new job philosophy in my class this year.
Thanks again to the Clutter-Free Classroom for this wonderful new outlook on classroom jobs!


And for those of you who are like me and are wondering what all of those jobs are on my board, here's a list so you don't have to squint.  ;)
 
*Collecting Papers
(gathering the papers when students need to turn them in to be graded or recycled)
 
*Passing Papers
(except for tests which I always pass out myself)
 
*Microwaves
(cleaning them- I have 2 because we eat lunch in the classroom)
 
*Helping the Teacher
(for any jobs that come up that aren't on the job board)
 
*Filing Folders
(filing papers into our Friday Folders to go home)
 
*Pencils
(sharpening pencils in the "Dull" can, checking the floor for pencils at the end of the day)
 
*Lights and Doors
(turning on/off lights as needed, holding the outside doors for the class)
 
*Recycling
(taking the paper recycling out to our "Paper Gator" as needed)
 
*Calendar and Board
(changing the calendar at the end of the day and cleaning the board as needed)
 
*Lunch List
(taking the lunch order in the morning and reading off the lunch list each day)
 
*Cubbies
(checking the area under the cubbies at the end of each day so students don't forget anything)
 
*Chair Stacks
(making sure everyone's chairs are stacked and in the right place at the end of the day)
 
*Surface Dusting
(yep, I give my kids a Swiffer sheet and let them dust away!)
 
*Desks and Floors
(making sure the desks are lined up and floors are cleared at the end of each day)
 
*Checking in "Do Now"
(this is our morning work- last year I had a few students ask if they could check in what students turned in, put them in number order for me, etc.  I LOVED them for this!!)
 
*Messages
(delivering anything to other teachers or the front office)
 
*Class Library
(straightening up the shelves, making sure the books are in the correct baskets)
 
*Library Books
(collecting and delivering our school library books once a week)
 
*Absent Student's Jobs
(pretty self-explanatory)
 
*Pillows
(I have 8 or 9 pillows in my reading area and I can just imagine what they'll look like everyday if I didn't have someone trained to straighten them up for me.  I'm a tad OCD.)
 
If you have any fantastic ways that you've implemented class jobs into your teaching, I'd love to hear more about it!
 

Friday, August 9, 2013

five for friday

Since I successfully did my first "link-up" with Throwback Thursday yesterday, I decided to try another one today- it's "Five for Friday", linking up with Doodle Bugs Teaching.


I love how this linky is simple:  write about five things you did today or this week and link up your post to hers.  A fun way to quickly read about the great things that other bloggers are up to at this crazy time of year!  :)

Here's what I've been up to this week:

Number One:

Target Dollar Spot Pocket Chart


When I saw these little pocket charts at my Favorite Store in the World the other day, I thought "Hmm..I wonder if those would be good for my Reading Street Amazing Word cards?"
(Yes, I do realize that I have extremely riveting inner dialogue....you're jealous, right?)

The answer:  PERFECT. 
Eight slots and the maximum each week has is....you guessed it, eight.
And they fit so well it's almost like Target and Reading Street teamed up to make a teacher's life easier.  And cuter.  And more organized.  You get the idea.


Number Two:

New Jobs Display


Okay, so this is just a computer shot of the sign I designed to top my display.
The reason I'm not including any other pics is because I have a blog post in the works to explain and show the process I went through in making it.
I also like to make people wait for things.
Must be the teacher in me.


Number Three:

Cute Covered Bookshelves

This is an "After vs. Before" shot of the metal bookshelves in my classroom.
Note the lovely rust spots on the bottom one.
Gross.


With the extra contact paper I had from my other projects like these, those rusty shelves are now adorably bright and stylish.


And with the books now organized and back on the shelves, I'm so excited to share it with my new group of students in a few weeks!


Number Four:

Supply Labels


I used to have all of my shared class supplies in different areas of the room, in baskets and tubs and cans.  For a couple different reasons, I needed to change my organization of these items this year and decided on this seven-drawer cart.  I really wanted black (to match the other two rolling carts I have), but I went for function vs. fashion in this case. 

UPDATE:  You can get these labels, and many more like it, at my Teachers Pay Teachers store.

Since I was changing some patterns and colors in my room already, I decided to create my own labels for these drawers.  After laminating and cutting out the labels, I attached them to the drawers with my favorite-- clear contact paper.
When I say favorite, I am being sarcastic.....I've had some issues with it in the past.
Not sticking right.  Not being able to get the backing off.  Curling up or getting stuck on things that I don't want it getting stuck on.  Ruining my hard work labeling something.  You get the point.

However, on this day....I won the battle.


I'm a tad bit obsessed with labeling things.
Please join my support group.
(oh right....I don't have one)


Number Five:

Day of Laziness....or Relaxation


After all of the work I put into my classroom this week, I decided to "take a personal day".
I'm still in my pajamas (and it's 5:00 PM).
I've either watched TV, gone on the computer, or cooked/ate all day.
Oh, and I did a little cutting out of laminated numbers, too....but it was while watching America's Next Top Model, so I really don't count that as work.  ;)

It's been a lovely day.
I needed it.

If you're a blogger, you should think about joining this "Five for Friday" linky....today or another Friday.  It's a fun way to write about the little things you want to share, all in one place!