Monday, July 1, 2013

from antique to chic

On a road trip to Chicago last summer, we stopped at a couple antique malls on the way and I came home with some fun "new" items:


Well....the bowls have been used, the necklaces have been worn, and the adorable little spice rack has taken permanent residence in my bright, cheerfully remodeled kitchen. 
Read more about that process here.  (I'm pretty proud of it.)  ;)
 
But those two shelves.....I had something else in mind for those.
Which I finally got to this weekend.
 
When my sister moved out of my house last year and I turned her room into a guest room (read more about that here), I had a general idea of how I wanted to decorate it, but not enough time to do everything before the summer wrapped up.
 
These shelves, with their intricate design, were begging to be hung in that room.  If you look at the bedding, you'll see what I mean.  However, the colors of the shelves didn't really go with my vision, and they were pretty dirty and scratched up.


Enter.....my new obsession with....spray paint!
 
I had also found this amazingly perfect picture at a small shop near my hometown (where the heart is), and the aqua-blue color in this was the inspiration for the color I decided on for my shelves.
 
 
I also found this frame at a garage sale for.........wait for it................25 cents!
 
 
Now granted...it is tiny (about 4x6 in.) and had a faded and ripped print stapled onto the back of it.
(Yep, stapled.)
So it really wasn't worth much....but for 25 cents I thought I could use this for something!
 
So here is the process of how I turned these from antique.....to chic.
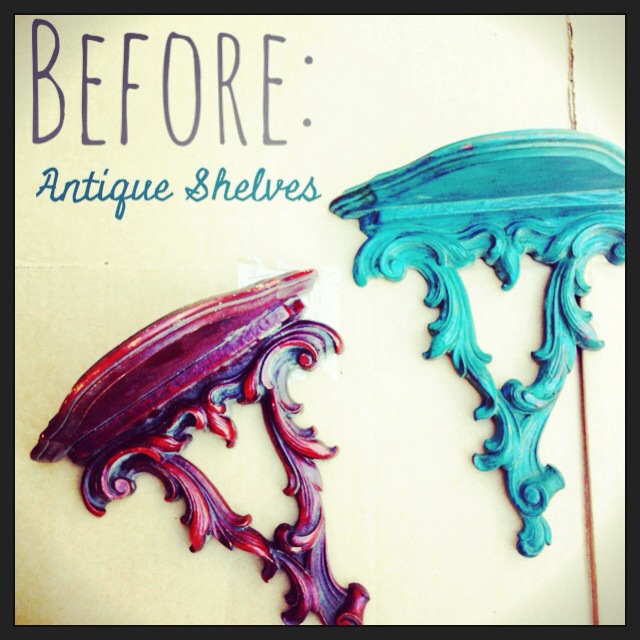
 
 
I laid everything out on a large piece of cardboard.  And, while I did this in the shade on my deck, I would definitely suggest covering a larger area than I did. 
Let's just say that I have the blue outline of where that flattened box was on my deck.
But, that's okay.....my deck is in some serious need of a repainting job anyway.

 
Here are all the materials you'll need:
*Spray Paint
(I used Rustoleum Paint Plus)
*Sanding tools
(I had some medium-grain sandpaper sheets and a fine-grain sandpaper block)
*Plastic gloves
*Optional: safety mask 
(In other words, I didn't use this but thought it might be a good idea in the future.  There were a couple times when I had to take a break and walk away from the fumes.)

 
First step- prep the material you're painting. 
For my shelves, I cleaned both of them off with soap and water, dried them really well, and then sanded them. I used the medium-grain paper first, then smoothed them out with the fine-grain block.
 
 
For the frame, it was pretty clean so I just lightly wiped it down with a cloth. 
Also....it's not wood so I didn't need to sand it!
 
I also cut a piece of paper to cover the print because I wasn't sure yet what I was going to do with the frame.  Not positive why I felt the need to "protect" it, but I did.
If you were actually spray painting a normal frame that has removable glass/backing....you would do that first.  But mine didn't have that option.
Because....as I said....it was STAPLED onto the frame.
So strange.

 
Second step- set up what you're painting on something so you can get at it from every angle.
I used shoe boxes. 
Because I just bought two new pairs of flip flops.....and they were going to the recycle bin anyway.

 
Third step- follow the directions on the spray paint can and go crazy!
Well, not really crazy because that would be unsafe.
And unhealthy.
And.....well, crazy.
 
But have fun with it!  That's what I meant.  :)
 
I only sprayed light coats each time, to prevent any dripping, and I let each coat dry for an hour before spraying on the next coat.  I'm not sure what the standard amount of wait time is, but that's what I did and it worked so I'm going with that.


Here they were after three coats.

And a close up of the frame....just because it was so cool-looking with its monochromatic-ness.
(I know....not a word.)
 
A few days later....after I was sure they were dry and ready to manhandle, I tackled the next and final step- hanging them up.

 
These shelves had some very flimsy-looking contraptions that you might use to hang them.
If you were okay with them possibly falling off your wall and breaking.
Which I wasn't okay with, so I removed those and put on new contraptions.
 
Sorry, I really don't know a better word for these than contraptions. 
Thingamajigs? 
Whatchamacallits?  
I'm not technical with any of my DIY-terms.  I apologize.

 
Here's what I bought....oh look- a technical term for them?  D-Ring Hangers.
Yep, that's what I used!
Of course they came three to a pack and I needed four.
Well played, Readyscrew company, well played.


They were super easy to install, especially since I already had tiny holes from the tiny rusty nails that were already on the backs of the shelves.

 
Then...I came up with a brilliant idea....kind of similar to what I did in this post when I hung up artwork in my dining room.
Only, instead of using a clear sheet of plastic, I just used painters tape.
I cut off a piece a little wider than the space between the two D-Ring Hangers (technical term- check!) and taped that over them.  Then I used a sharpie to mark the exact middle and top of each of those hangers.  Basically, where I wanted the nails to be.

 
Here's the one thing I am most proud of.....eyeballing where I wanted the shelf to be, sticking the tape to the wall, and...with a level on the shelf, holding it with one hand while at the same time taking a photo. 
Okay, proud might be the wrong word.  Impressed, maybe? 
I'm a clutz....so really, this is impressive.


Anyway, once I had it level, I pressed down on the tape and carefully took the shelf away.
I even double checked the dots with the level a second time before hammering in the nails.
I really didn't want to have to do that balancing act more than necessary!
 
Then, I just slightly hammered each nail into where the sharpie dot was, just enough to see where they needed to be.  Then I removed the tape and hammered them in all the way, and then put the shelf up on the wall!

 
And....although this photo is slightly askew, the shelf is actually perfectly level.
I promise.

 
I have had the middle set of frames up since last summer, but the space around it was perfect for my two shelves, and some smaller very inexpensive frames to decorate them for now.

 
And that frame I spray painted.....got a cute piece of scrapbook paper glued on top of the original print.  My first time using spray adhesive, but it turned out just how I hoped!
 
And how adorable are those miniature bird salt-and-pepper shakers?  Found them in the clearance bin at Michael's last year, along with the little white frame.
I just love when I can combine antique finds with clearance finds and make them my own!

Wednesday, June 26, 2013

breakfast (or lunch...or brunch) sandwiches

Some days....okay, most days....Pinterest makes me hungry.

Which can be a good thing (on days when I find healthy recipes) or a not-so-good thing (exhibit a: I have an entire board dedicated to "Sweet Stuff").

And then some days I meet somewhere in the middle, and find a pretty healthy recipe that also satisfies my craving for some good old comfort food.
The other day I found a link to this recipe:


http://www.realsimple.com/food-recipes/browse-all-recipes/english-muffin-egg-pizzas-10000000663044/index.html

Although I'm really not a fan of the hard-boiled egg (I just eat the white part and throw away that gag-inducing-pasty-looking cooked yolk)...this breakfast sandwich (or "pizza" as they call it) looked pretty good.  So, of course I needed to put my own twist on it and change the recipe a little.  :)

Quick shout out to McD's for the changes I made to my recipe-- I had a coupon to try their new breakfast sandwich, and I used a lot of their ingredients to inspire my adjustments. 

Here's how I made my Egg White, Tomato, Ham, and White Cheddar Breakfast Sandwich

We'll start with the cast of characters (a.k.a. ingredients)...and note, this is just for one sandwich, which ends up being two open-faced "pizzas".


English muffin (I used whole wheat)
Ham
(McD's uses Canadian Bacon, and I might try that sometime but this is just thinly sliced deli ham)
White cheddar cheese, sliced
Tomato
Eggs (I used two since I was only using the whites)
Salt & Pepper
 
Very basic ingredients....and I might play around with them the next time I make this.  I'm thinking a white cheddar/béchamel sauce would be DELICIOUS on these!  Fresh herbs would be a great addition as well.  Okay....on to the actual recipe I used.... 
 
First step:  Preheat your broiler on high and have a pan/cookie sheet ready for the sandwiches.

 
Separate the whites from the yolks if you're making it egg-white-only like I did. 
 
And revel in your masterful skills of separating eggs and juggling your iPhone to take a picture!
(sorry....I was just so proud of myself for not dropping either the egg OR my phone....I'm a little lot clutzy so this was a big deal).


Slice up the tomatoes.

 
Heat up a little butter in the pan, then pour in your egg whites.

 
I'm sure there is a more technical way to describe this cooking method, but I just kind of scooted around the egg whites until I had a rectangular-shaped egg.  I was eyeballing it to make something twice as large as the muffin halves.
 
Don't forget to season your eggs during this step- salt and pepper is all I used.

 
When it's ready, flip it.  I've never been great at flipping fried eggs, so leaving out the yolks makes this much easier for success.  :)

 
When it's done, cut it in half.

 
And lay the cooked egg whites on your muffin halves.
 
Note:  I forgot to toast these, but they were fine as is.....although next time I am going to toast them.  Because I love the texture and taste of a browned bread.

 
Lay on your ham slices....I used one and a half of the thin slices on each, but go more/less depending on your taste.

 
Then add a slice or two of tomato.


And a couple slices of the sharp, delicious white cheddar.

 
Set in under your broiler, leaving the oven cracked open so you can watch them.
If you're like me, this step is super important.  Because otherwise, I'd get distracted and forget about them and burn them and then wonder why I never learned my lesson in the first place.
 
I've learned my lesson. 

 
See....since I was watching them, they came out just in time!
The cheese was melted and bubbly, the ham was a little browned on the ends, and the muffin was toasty but not burned.

 
A great breakfast (or in my case....brunch....since I had it at 11:00 this morning). 
 
 
And for me, I could only eat like one and a half of these.  They're pretty filling!
 
If you have any ideas of what I could add to these, let me know....I'm always looking for ways to make my recipes more interesting! 

Thursday, June 20, 2013

endings...and beginnings

For those who know me, you already know this.  Bear with me.

I'm an emotional, sappy, nostalgic, sensitive, easily-brought-to-tears kind of person.

Movies (okay, even movie *trailers*), a good book, those background stories they show during the Olympics or reality competition shows, touching commercials, great concerts, musicals.......it is a miracle to get through any of these without shedding a tear (or becoming a hot blubbering mess).

Which brings me to part of the title of today's post: endings.

A couple weeks ago, we had our last day of school.  Now, I've been doing this for a while so you'd think I'd be a pro at saying "see ya!" to all of my students....no problem.

You'd be wrong.
For three reasons.
And three words.
The Last Day.

First....even with the challenges and struggles we have gone through this year, I genuinely care for and will miss each of my students.  Yes, some more than others.....teachers, you know what I mean.  When it comes down to it though, I have made a connection with each student.  I love getting to know them as individuals, seeing them grow and change and mature throughout the year.  That's really why I continue teaching- for the kids. 
So....as nice as it is to finally have a break to rest my mind and rejuvenate for next year....I'll miss them.

The second reason-- my end of the year slide show.  An emotional experience that I endure multiple times before even showing it to my students.  I don't have any fancy program that I use....just good old PowerPoint.  And with over sixty slides, and most slides having more than one photo, it takes a while to create.  Going through the pictures I've taken throughout the year is always a fun (yet tedious) task, but once I put them into the slides and set them to music......waterfall of tears. 
My favorite part though is when I show it to my class (twice-- because they always ask to see it again).  I absolutely love hearing them find themselves, their friends, their favorite trips or activities....some laugh, some cry, some just smile....but I know it was worth doing.

And the third reason I'm an emotional mess on the last day of school.....this story.


I don't remember where I found this story, or if I changed the title....but it's something I've been doing as a last day of school activity for as long as I can remember.
Quick summary....a teacher has her students write down something positive about each of their classmates, she compiles those and makes a list for each student, hands them out and never really goes back to the activity.  Years later, one of those former students is killed in Vietnam and she attends his funeral.  Someone finds out that she was his teacher, and she finds out that he kept that list with him at all times....in fact, many of his classmates from that year (who are also at the funeral) also kept their lists.  And of course, this brings the teacher to tears.  And I literally have to stop reading a few times during the story because I get all choked up. 
I'm actually glad that the students get to see me this way.....to show them how much of an impact they not only make on each other's lives, but on mine as well.
You probably have guessed it.....we make lists for each other on that last day.  I want the students to see how others see them, how amazing they are, and how much they have meant to each other.  And of course....I participate in this not only so I can have my own list, but so that I can tell the students what I'll always remember about them.
 
I ended the last day of school with a gift to my students that I found from a link on Pinterest.  It led me to this Teachers Pay Teachers page:
 
For free, you get to download these super cute labels for a student's "Survival Kit for Life"....and then you get to be creative in putting together the kits.
 
First....I went shopping for all the items.
I got almost everything from Meijer....except for the Pop Rocks.  Those were 3/$1 at the Dollar Store!
 
Once I had all of the items, I set up an assembly line and put one of each item (except for the candy- I had enough for two of each for those) in clear cellophane "treat bags"- like the ones you'd use for kids' birthday party treats. 


Here is a close up of what is in each bag, including the tag...


I stapled the tag on the front, added their name and signed mine at the bottom.  So fun!


It was the perfect way to end the last day.....by giving my students a few reminders as they leave me, and each one went with each item like "You rock!" (Pop Rocks) and "Keep smiling!" (smiley face stickers).   :)


To quickly explain the second part of the title of today's post.....beginnings.
As it's the beginning of summer, I have created my long list of things I hope to accomplish in the next couple months.  Just like I did last year- check out that post here.
 
It's always way longer than necessary, but having goals is good and keeps me from having too many lazy days.  Like yesterday when I literally did not leave the house, stayed in my pajamas, and did whatever I wanted.  It. was. amazing.


I'm sure there will be future posts about some of these summer projects....so stay tuned!  :)

Sunday, February 24, 2013

favorite combinations

Those who know me well will not be surprised when I say that movie popcorn and a trip to the local movie theater is a favorite combination of mine.  I swear there is something added to that popcorn that creates a chemical addiction.....but, that is not the reason for this post.  :)

I was watching the Rachael Ray talk show the other day and she made a quick and easy "snack" (although I had it as a meal) called bacon cheeseburger quesadillas.   The brilliance of combining two delicious comfort foods was not lost on me.

So I tried my own version of it at home the other day......and it was delicious.  And easy. 
And just so you don't think I'm the only one with this opinion, my sister was over for dinner and it won her approval before I even asked if she liked it.  ;)

Here are the ingredients I used inside the quesadillas-- although you could add any favorite toppings you fancy!  RR used bacon in hers....but I didn't have any on hand, or you know I would have.
Bacon is up there with movie popcorn for me in its crack-like-addictiveness. 

 
The first step was making the meat-- which I did the other night so I don't have pictures of that process.  But really, it's browning meat.  No rocket science there.
 
I added some seasonings that I would add to a hamburger (grill seasoning and "garlic garlic" from
Tastefully Simple).  I also added a large squirt (maybe a few tablespoons) of mustard and ketchup (a little more ketchup than mustard).  That's the "meat sauce" for the quesadillas.  
I think next time I'm going to add some chopped onions to the meat while it's browning. 
I'm not a huge raw onion lover, but I looove me some cooked onions.


Heat up a tortilla in a skillet.  Medium to Medium High Heat.
 Flip it once.
I just wanted it to be a little warm before adding the ingredients.

 
Add a sprinkling of your favorite shredded cheese to be the "glue" for the other ingredients. 
I used a blend of different cheddars.
Do this only on half of the tortilla since you're going to fold over the other half.

Then add the meat, and a little more cheese.
Or a lot more.


Pile on the toppings- I used chopped lettuce, tomatoes, and pickles.
And I kind of went a little crazy on the toppings, which made for a very thick quesadilla.

 
Fold over the other half. 
Get a little forceful with it if you are overzealous with the toppings like I was.

 
Then take out your aggressions and press/smack down on the top of it until it starts to melt together. 
And yes, you're going to have a little mess as the toppings try to escape.
But you can show them who's boss. 
(I'm really not an agressive person, but I like to pretend I am while I cook.  Sorry.)

 
Flip it over a few times until the tortilla is golden brown on both sides and the cheese seem to be completely melted.
Or until you can't wait any longer.
Whichever comes first.

 
I like to use a pizza cutter to slice my quesadilla into wedges.


And here is the best part.....ready to eat!
It really does taste like a cheeseburger and a quesadilla all in one.
A lovely combination.
 
This might be the perfect snack/meal for you tonight if you're like me and going to be glued to the TV for a few hours to watch the Academy Awards.
 
What's your favorite combination-- food or otherwise?

Tuesday, February 19, 2013

confessions, part II

 
Everyone sticks a kitchen spoon into the snowbank on their deck to check the depth, right?  :)

It's been a while since my last post....I blame winter.


Just to clarify, I'm not complaining.  I've lived in Michigan my whole life, so I know winter very well.   I accept that there are months of rollercoaster weeks where we can go from sunny days with temps in the 20's one day, to the 60's the next day with nonstop rain, to a drop back to temps in the teens and lake effect snow the next day. 
I don't particularly like it, but I accept it.

So....back to why I blame winter for my lack of blogging.....
Whenever winter hits, I experience a serious drop in motivation.  I know there are studies out there about the effects that lack of sunshine causes.  So true for me.

This brings today's post.....Confessions, Part II 

1.  That goal I set for January....to only eat at home?  I (pretty much) followed it the whole month.  Two exceptions:  staff party and a birthday dinner.  But other than that, I was Miss Self-Control.  And a pro at eating and remaking leftovers.

You would think that would carry over to February......but, not so much.  

I did set a new goal for February.  Actually, it's for Lent, so it's a little longer than February. 
No apps on my phone.  No facebook, instagram, pinterest, email, games, photo editing apps, music apps.....if it's on my iPhone and not necessary (phone calls/texts), it's going to be seriously neglected for a while.  Not to say I can't check things on my computer, but I've gotten way too attached to my phone, so it was time for a little break.

2.  Speaking of technology, I do not understand the need people have with always getting the "next big thing".  Like when the iPhone 5 came out, I was asked numerous times if I was going to upgrade and get it.  Seriously?  Because it's sooooo much better than my 4s....which I just got in April, and works perfectly.  I don't get it.  Maybe because I've never been someone who feels comfortable spending large amounts of money on material things (because I've never had large amounts of money), but I just don't get it.

3.  Going back to the drop in motivation....I have probably spent a majority of my days off (snow days and weekends) over the past couple months doing more unproductive than productive things.  And I don't apologize for it.  And I'm not ashamed of it.  Because if I can spend a day watching Lifetime Movie Network, shows on my DVR, and three seasons of Psych that I borrowed from my 14 year old nephew.....and I stay in my pajamas the whole day....I'm totally cool with that.

4.  I've seen all but one of the best picture Academy Award nominees.  For those of you who don't know.....that would be eight out of nine.  Hoping to see Life of Pi before Sunday's award ceremony to make it nine for nine.  Yep, I'm totally a movie addict.

5.  Someday, I might need to get a new front door with a peephole.   Because when someone comes knocking on my door without notice, I don't answer it.  If you know me, you'd call me.  If you don't know me, I'm not answering my door.  Because I don't know you.  And I have a slight fear of crazies. 

Now that I've broken the streak of no blogging for a while, I'm hoping that my next post will be a little more productive.  Because.....I could definitely use a little more productiveness in my life.  :)

Friday, January 4, 2013

baby steps

I've never been one to make New Years Resolutions.
Probably for the same reason that most people don't-- I probably would fail at keeping them, or get busy and forget, or just try to make them "too big".

However, I'm really good at short-term goals.  Small ones.  Baby steps.

Last year, I started trying this idea out with my goals of no technology (cell phone, computer) within an hour of bedtime. Then, I started forcing myself to go to bed earlier. 
I made a goal to do each of these for 30 days, and I was pretty successful.

But then.....the holidays hit.
And I slacked off.
A lot.
In fact, I've been on my phone or computer before bed....and I've been staying up WAY too late.

That doesn't mean I'm throwing in the towel and saying it's over.
I just needed to recognize that my bad habits were creeping back (for lack of a better reason-- because I was busy and stressed and felt like I "needed" it) and decide that I'm going to hop back on the healthy train.

So, here's my plan.
You could call it a "resolution"....but I'm calling it a plan.  

Every month this year, I'm going to focus on a new healthy habit.  If I feel like I can keep going with that habit without being Mrs. Crabby Pants, I'll stick with it and add a new one.  If not, I'll just start the new habit of the month.

January's goal is to only eat food from home. 

First of all, this means no going out to lunch with my co-workers (for those who know me well, this is going to be tough!) and no ordering Jimmy Johns to deliver my lunch either.  All of my lunches need to come from home.   Sure....I can stock up the Lean Cuisine meals, but it will still be healthier than what I would get at Panera or Wendy's or Noodles.  And-- it will be much cheaper.

For dinner, this means planning ahead, grocery shopping on a regular basis, and cooking healthy meals for myself instead of stopping at a drive thru or getting take out on the way home from work.  If I get really good, I could even make the dinner leftovers become my lunch the next day. 

I haven't planned out the rest of my goals for each month of the year yet, so if you have any ideas for me I'd love to hear them.  Anything related to becoming a healthier person is what I'm looking for-- eating habits, exercise, decreasing stress, improving my immune system, sleep habits, etc.

Oh Wendy's....I will miss you.