Showing posts with label garlic. Show all posts

Monday, July 28, 2014

summer kale pasta salad

It's summer.....although you wouldn't know it today.  Late July in Michigan, and it struggled to get out of the 60's. This is usually one of our hottest stretches of the year, but today feels a little like fall.

Not that I'm complaining....I don't wish for a repeat of the heat waves we've had in the past few summers.

There is a point here.
Trust me.

So....as summer comes, my food cravings change.  I think it's pretty typical-- I don't crave warm, hearty soups, stews, and heavy pasta dishes.  I generally want meals that don't (a) require me to use the oven/stove, and (b) are on the "lighter" side.

However....as I have written about in the past in this post, I am a huge fan of pasta, even in the summer.
My "summer pastas", while lighter and definitely more figure-friendly, still require me to crank up the heat in my kitchen.  Not my favorite thing to do on a hot summer day.....but today.....

Following me now?  ;)

I decided with the cool weather today, what better time than to make a new summer pasta dish!

A couple weeks ago, a coworker saw that I was making kale chips after I posted a picture on Instagram....and she told me about this recipe she just pinned on Pinterest. (Thanks, Maggie!)  Since I had just bought some kale at the store yesterday, I decided to make it today.

My recipe was inspired by this Kale Pasta Salad by the Pioneer Woman.  

Summer Kale Pasta Salad


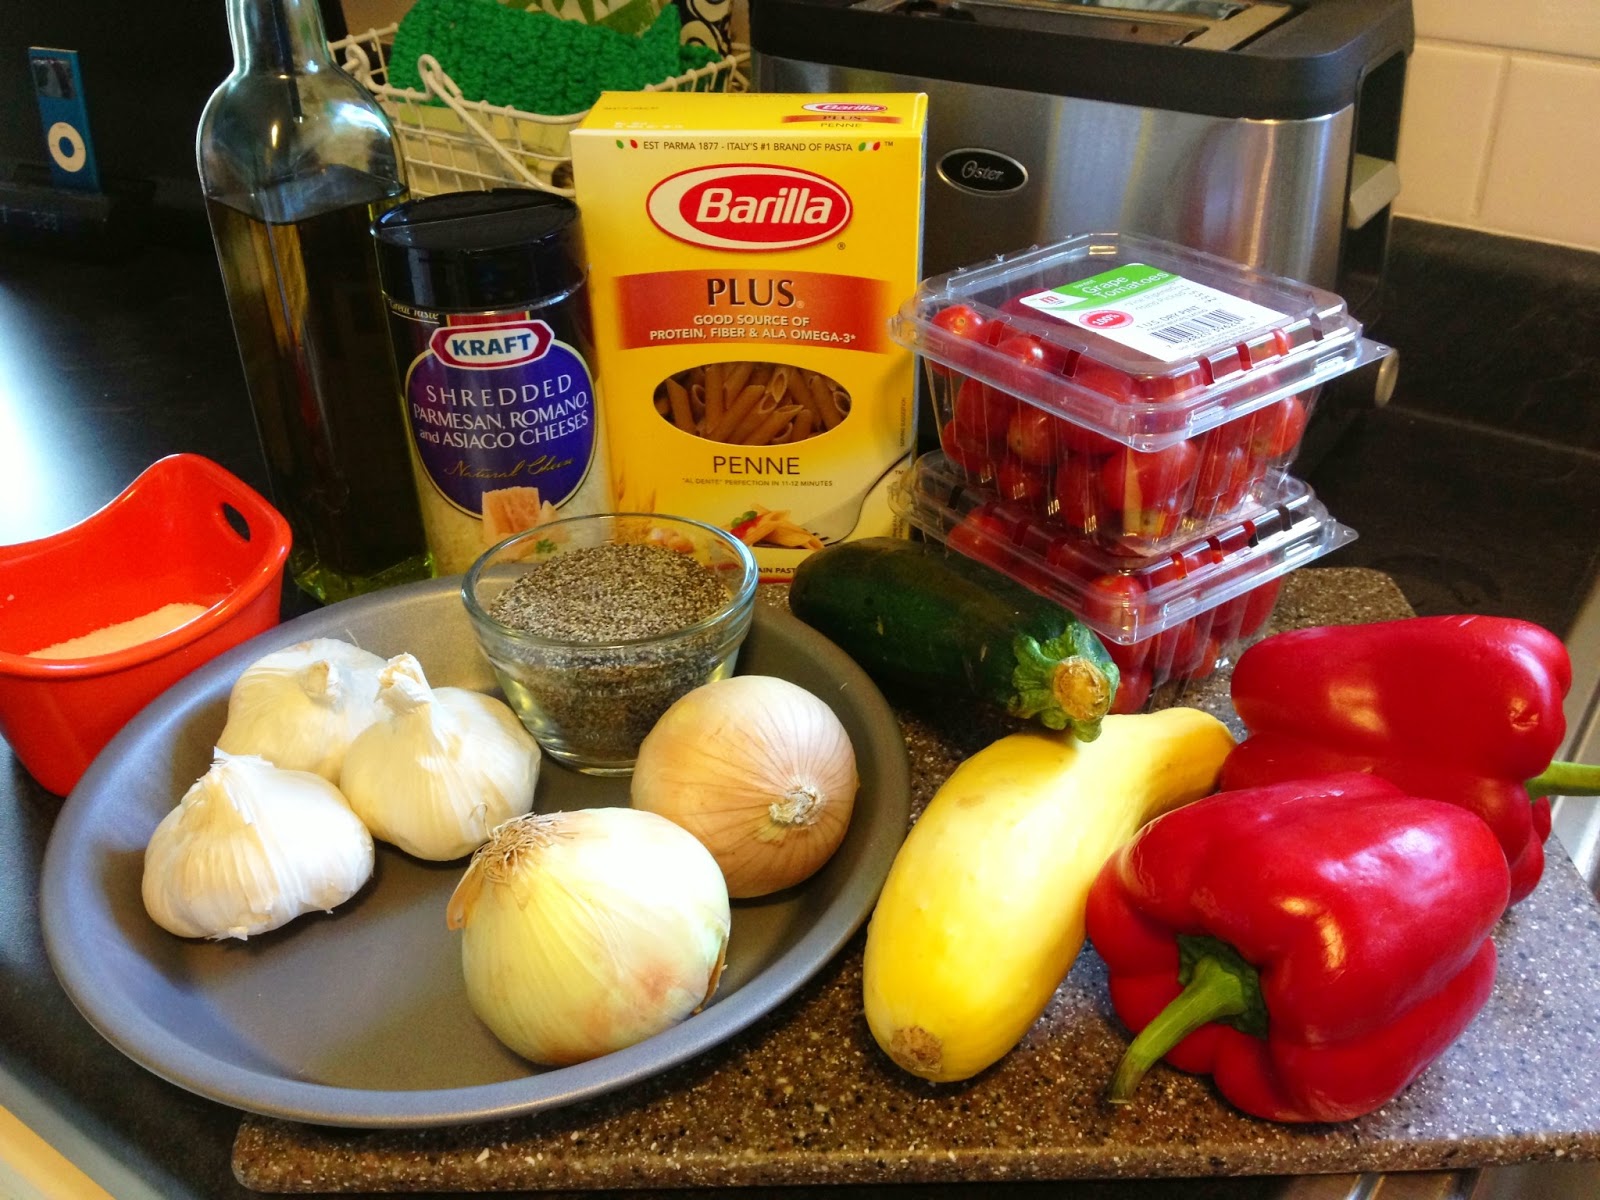
First, I assembled all of my ingredients like the good little blogger that I am....and in true "my own twist on things" fashion, I changed up some of the ingredients to fit with what I had at home and what I love.


What I used....
Olive oil
Balsamic vinegar
Bowtie (Farfalle) pasta
Grape tomatoes
Slivered almonds
Garlic
Salt & Pepper
Shredded cheese
Kale


First, I poured about a quarter cup of slivered almonds into a small pan and let them slowly warm/lightly brown up over low heat.  I would shake/turn them once in a while, and probably left them on the heat for about ten minutes.  The original recipe used pine nuts....but (a) I didn't have any at home and (b) I LOVE almonds!  This was one of my favorite parts of the salad.  Their crunch was the perfect complement to the softer texture of the rest of the ingredients.

At the same time, I brought a pot of water to boil, added a little salt to the water, and dumped in a pound of pasta.  Although I generally stick with whole grain pasta only, for this recipe I really wanted to use the bowtie pasta like in the original recipe.  So I "splurged" a little.  Honestly though, you could use any short-cut pasta that you like or have on hand.

Next, I broke apart a bunch of cloves of garlic, and did the fun "pound the flat side of the knife on the cloves" trick to get the skins loose.  You could just mince the garlic at this point, but I have a crazy love of using my hand grater to finely grate garlic.  
So that's what I did. I just don't have the skill (coordination) to take a picture of me doing it.  ;)

I coated the bottom of a large frying pan with olive oil (I don't measure....sorry), and then grated in the garlic.
Smells.  So.  Good.
And then, because I LOVE grape tomatoes, especially when they get warmed up and burst open....I added those to the pan after the garlic had some time to infuse the oil with its deliciousness.

(NOTE:  I added about a cup of tomatoes to start, but later (not pictured) added another cup because I thought it needed more)

When the pasta was done cooking, I drained it and poured it back into the hot pot (off the heat).
Then....when the tomatoes were just starting to shrivel a little, I poured the garlic oil/tomato "sauce" over the cooked pasta.

Add a little salt and pepper at this point, and just let the pasta sit and absorb all that flavor, and the tomatoes will continue to warm as well.


Drizzle in some balsamic vinegar to give it an extra "zip" of flavor....but be careful.  This stuff can be strong.

Meanwhile....I had ripped the leaves off the stems of a bunch of kale and then gave it a good "rough chop".
Which is a cooking term meaning.....not fancy.

Then....all of that kale gets dropped into the SAME pan you made the garlic oil in.....which you DON'T wipe out after pouring the sauce into the pasta.  It's the perfect amount of oil/seasonings to cook the kale. I just kept tossing it over low/medium low heat until it had wilted down a bit.....kind of looking like this.....


Then I added the cooked kale to the pasta....


Sprinkled in the toasted almonds....


And while the original recipe called for shaved Parmesan at the end, and that sounds amazing....I didn't have any at home.  I did have shredded mozzarella....so I added about a cup of that.  :)


This is a great time to check your seasonings....a.k.a. take a taste.


I felt like it needed a little more pepper, so after adding that I mixed it all up and that's all there is to it!


Like I said....it is a great summer salad, but you could have this any time of year. 


I had a large bowl of it for dinner and it was SO filling....but it would also make a great side to something off the grill.....chicken, burgers, steak.....so many ideas of what I can eat with the leftovers!

Sunday, July 14, 2013

summer comfort food

I turned my air conditioning on today for the first time all summer....for two reasons.

1. It was in the 90's today and is supposed to be for the next few days...and while I'm usually a "fresh-air-and-bear-with-the-heat" kind of girl, trying to sleep when it's muggy and in the 70's is not my idea of fun.  So I caved.

2.  I had bought some veggies at the store the other day with a plan to make up a new recipe with them, and turning on the oven was NOT going to happen without some relief from the heat.

So, basically....today's recipe post was inspired and made possible by me turning on the A/C. 
And my love of comfort food.

In the summer, most people lean towards "lighter" vs. "heavy" comfort foods.  Instead of a hot, creamy, gooey lasagna....we might make a cold, simple pasta salad.   I'm kind of "in the middle" when it comes to my summer comfort food.  I still like warm food, but nothing too heavy. 
This recipe fits that description.

Here's how to make my....

Roasted Vegetable and Chicken Pasta Toss


*Side Note:  This could easily be made vegetarian by omitting the chicken....I just (a) love chicken and (b) had some defrosting in the fridge today.*

First, we have the ingredients:

 
Pasta (I used whole grain penne- about 3/4 of a pound)
Veggies:  garlic, onions, zucchini, yellow squash, red bell peppers, and grape tomatoes
Olive Oil
Salt and Pepper
Grated Cheese (I used a blend)
 
Not Pictured:  Chicken (I used about a pound of chicken tenders) and herbs (more about that later)


First step....preheat the oven to 400 degrees.
If you want an easy clean up, line two cookie sheets (the kind that have sides) with foil.
I used the amazing foil that has one "non-stick" side. 
 
The next thing you want to do is roast the garlic.  This takes the longest, so you want to make sure it goes in before any other prep.  You could even do this ahead of time.  I roasted three heads but was only going to use two.  The other one is in a paste in my freezer for a day in the future when I really want some roasted garlic but don't have the time to make it.
 
Ah....roasting garlic.....once I learned how to do this I was hooked.
If you've read my recipe posts before, you know about my infatuation with garlic.
And while I'm all for grating or mincing garlic to add it to recipes.....roasting it just gives it such a different yet equally delicious taste. 
 
Okay....love letter over.
Back to the recipe.  :)

 
First, you need to cut off the tops of the garlic heads (not the side with the roots).  I cut off about half an inch down, but it really depends on the size of the bulb.

 
This is what it should look like.
Then, I peeled off some of the outer layers of papery "skin" from the bulb, but not from the actual cloves themselves.  Just basically until you can see where the cloves separate. 
This is not a necessary step....I just have found it's easier to get every roasted clove out when I do this.  But you can totally skip this step and it will be fine.


Put them all on a large piece of aluminum foil and drizzle them with olive oil.

 
Sprinkle with salt and pepper.

 
And wrap them all up in a "pouch".  I put the pouch on a pie plate for stability, but you can actually put this right on the oven rack, too. 
I roasted mine for about 45 minutes, but the cooking time will vary slightly depending on the size of the bulbs.
 
The next step.....prep the other veggies for roasting. 
These don't need as much time as the garlic, but I roast them at the same temperature (400) so I probably put them in the oven for the last 20 minutes.  Again, the time you'll need will depend on the size that you cut your veggies and how much you use.

I cut up two red bell peppers, first in strips that were about a half-inch wide, then into chunks.

 
Then, I cut the ends off my zucchini and squash and cut those both into pieces that were similar in size to how I cut the peppers.

 
Did I ever mention that I love chopping? 
So much fun.
(I'm not being sarcastic....I really do love chopping.)


I wanted to get an orange and yellow bell pepper to make this even more colorful, but they weren't looking too great at the store.  Mushrooms would be good, too.
Lots of possibilities for next time!

 
More chopping....I chopped up two small onions.

 
One of the onions was mixed in with the chopped veggies, then tossed with olive oil/salt/pepper on the cookie sheet.

 
The other onion was thrown together with two pints of grape tomatoes, olive oil/salt/pepper....and some herbs.  Which I forgot to take out for the first "ingredients mug shot" so they get their own special photo.

 
Since these were going to be the base for my "tomato sauce", I went Italian with my herbs-- parsley, basil, and oregano.  If you're lucky enough to have fresh herbs growing at home, you could definitely use those.  You just wouldn't put them in at this point, but instead wait until the end.


At this point, I put the two pans of veggies in the oven with the garlic, and just kept checking on them until they were ready.  It was about 20 minutes.
 
While everything was roasting away, I prepared the chicken and pasta.
 
I cut up the tenders into bite-size chunks. 
This....is not my idea of fun chopping.  Raw meat is gross.
But cooked meat is yummy.
(sorry vegetarians and vegans....I'm a meat lover)
 
 
And added the chicken to a pan that had some olive oil and a pat of butter melted.  A little salt and pepper to season the chicken, and then just sauté away!

 
Once the chicken was started, I dropped the pasta into the boiling water.

 
And once everything was cooked and ready.....I started to assemble the pasta toss!
 
The roasted garlic came out first....and I let it cool down for a while.
If you try to squeeze it out too early, you'll definitely burn your fingers.
Learn from my mistakes.

 
Doesn't this look DEEE-LICIOUS?!

 
IMPORTANT:  Before you drain your pasta, reserve some of the starchy cooking water.  You'll be using it for your sauce.  I probably took a cup or cup and a half out, but take out more to be safe.  You don't have to use it all, but once you dump it, it's gone.

 
See how the tomatoes look all shriveled up and there's a lot of juices in the pan?
You want that.
It makes for a fantastic sauce.

 
And not to be outdone, here's the other pan of tender, roasted veggies.
YUM.
 
Here's how I made the sauce:

 
After draining the pasta, I used the pasta pot to start the sauce.
First, dump ALL of the tomatoes/onions/juice from that pan into the pot. 
Add some of the starchy water and use a potato masher (carefully- it will spatter) to squish the tomatoes and make a chunky sauce.
 
But wait....there's more....


Remember that gorgeous roasted garlic?   Squeeze those beautiful cloves right out of their skins and into your sauce.   I used two whole heads of garlic, but you could use anywhere from 1-3 depending on your love of garlic.  I really should have used three.  :) 

 
Mash the garlic into the sauce.

 
Add in the other pan of the roasted veggies, and the chicken. 
If it's not "saucy" enough for you, add some more of the cooking water.
 
If you've been seasoning as you go, you really shouldn't need to add anything at this point....but take a taste just to be sure.  Even the best chefs get sent home on "Chopped" because they didn't add enough salt.  Seriously, do they not taste their food as they go??
 
With a little sprinkle of grated cheese on top, and you're done!

Now that's MY kind of summer comfort food.

 
And really.....it's pretty healthy, too....bonus!!

 
Enjoy!

Sunday, October 14, 2012

sloppy joes, sloppy, sloppy joes...

A few weeks ago, I won three spice blends from a company called The Zesty Moose....a contest on another blog I follow.  It's such a rare occurrence that I win anything-- so getting this package in the mail one day was super exciting.
With school keeping me pretty busy, I kind of forgot about these in my pantry.  Until yesterday.

I came back from a shopping trip with a ton of veggies....it was a chilly, rainy day and I was in the mood for making soup. 


After making the minestrone, I had a few leftover ingredients and started brainstorming what to do with them.  I decided on sloppy joes....because (a) I bought some ground meat on sale, (b) it gave me a reason to try one of my spice blends and (c) I just love sloppy joes.

As seems to be the requirement for blog recipe posts, here is the requisite photo of ingredients:
 
ground meat (my package was just over a pound)
onion
orange bell pepper (you could use any color)
garlic
tomato paste
can of crushed tomatoes (about 15 oz.)
dry red wine
worcestershire sauce
broth or stock (beef or veggie)
salt
pepper
seasonings (more about that later)
 
A few things I've used in the past but weren't in this recipe...
carrots
mushrooms
parsley
ketchup
mustard
 
My first step was to chop the veggies.  This is always my favorite step.  I have a crazy love for chopping.  If I ever decide to take on a second job, it will probably be as a sous chef.  :)
 
First, I chopped the onions.  And took a break halfway to wipe the tears from my eyes (and take this picture).  If you have any suggestion for how to cut an onion without tearing up, do share!
 
 
Next was the garlic.  Which, if you read my last post, is another one of my loves.
I grated a few cloves.  Don't forget to scrape the back of the grater!
 
 
For the bell pepper, I learned a new method of chopping it to waste less.
First, you chop off the top and bottom.  Then you cut out the middle ribs/seeds.  That way you can chop all of it without throwing away any of it with the stem/ribs!


After chopping the top and bottom, slice the middle section into thin strips.  Turn these and dice to the desired size.  I chopped mine pretty small for this recipe, to match the size of the onions.


Drizzle a little extra virgin olive oil in a pan, and add the ground meat. 
 
 
Brown up the meat, and depending on what kind of meat you use, you may need to drain the extra fat.
 
 
I learned this great trick on Pinterest for draining fat with an easy clean up.  Line a bowl with some foil, and pour the fat into the foil.  Once it hardens, all you need to do is take the foil out and throw it away! 
 
 
Add the chopped veggies to the meat, and saute up a little while (I added another drizzle of oil). 
 
 
I buy my tomato paste in a tube when I know I won't be using an entire can.  I just squirted about 2 tablespoons of tomato paste into the pan and stirred it up until it was fragrant.
 
 
Next, I poured about a half cup of dry red wine in the mixture and cooked it out for a minute.
 
 
Next, a little worcestershire sauce...
 
 
And then the spice mix.  I started with a heaping teaspoon of it. 
This mix has a ton of fantastic flavor:  garlic salt, onion granules, minced garlic, chili powder, jalapeno powder, cilantro, cumin, lime powder, and tomato powder.
 
 
(I added another half teaspoon-full of it later....it needed an extra kick!)
 
Finally, to give it that "sloppy" consistency, I added a can of crushed tomatoes.


I also added about a cup of veggie broth I had leftover from last night's soup.  To make sure I had every last bit out of the can of tomatoes, I "rinsed" out the can with the broth.  No picture of this....sorry.  I did take a picture of how sloppy it looked after all the ingredients were added:
 
 
Leave this simmering on the stove for as long as you want-- basically, until the consistency is what you want it to be.  This is what mine looked like when I was ready to eat.
 
 
(Oh, and I did add a few squirts of mustard and ketchup at one point.  I just couldn't resist adding a couple more ingredients!)
 
After toasting up a couple hamburger buns, I topped my bun with some sloppy goodness.
 
 
And just couldn't help myself.....a little shredded mozzarella was necessary.
Okay, not necessary.  But a really, really good idea.
 
 
With a side of some lightly salted potato chips (love them more than the regular-salted ones!), my comfort-food fix for the day was complete. 
 
 
Thanks again to Mom Colored Glasses for the giveaway, and to The Zesty Moose for the freebie!
I'm looking forward to trying out more new recipes with these fun spice mixes!  :)